Is your 2017 Ford F150 key fob looking worn out, cracked, or simply not up to your standards? Instead of replacing the entire key fob system, a cost-effective and straightforward solution is to replace just the shell. This guide will walk you through the process of replacing your 2017 Ford F150 key fob shell, enhancing its appearance and protecting the internal electronics.
Replacing your key fob shell is a simple DIY project that can save you money and time compared to dealership replacements. Whether your original shell is damaged from drops, daily wear and tear, or you just want a fresh new look, this guide will provide you with the necessary steps. We’ll be focusing on using an aftermarket injection molded key fob shell, similar to the popular AJT Designs option, for a durable and custom feel.
Before we begin, it’s important to note that this process involves transferring the electronics from your existing key fob into a new shell. You will need a replacement key fob shell designed for your 2017 Ford F150. Let’s get started on giving your key fob a much-needed refresh.
What You’ll Need for Your Key Fob Shell Replacement
To successfully replace your 2017 Ford F150 key fob shell, gather these tools and materials:
- Replacement Key Fob Shell: Purchase a shell specifically designed for the 2015-2020 Ford F150 models (this range typically includes the 2017 model). Look for durable materials like injection-molded plastic for longevity.
- Utility Blade or Small Flathead Screwdriver: A sharp utility blade or a small flathead screwdriver will be needed to carefully separate the two halves of your original key fob shell.
- New Replacement Key Fob (Optional but Recommended): If you are concerned about damaging your original, branded key fob during disassembly, or if you only have one key, consider purchasing a blank aftermarket key fob online. This allows you to practice on a less valuable fob and ensures you always have a working key during the process. You may need to program this new fob to your vehicle if it’s not already programmed.
Step-by-Step Guide to Replacing Your Ford F150 Key Fob Shell
Follow these steps to safely and effectively replace your 2017 Ford F150 key fob shell:
Step 1: Programming a New Replacement Key Fob (Optional)
If you’ve opted to use a new, unprogrammed key fob for this process, you’ll need to program it to your 2017 Ford F150 before taking apart any fobs. This ensures you have a working key throughout the process. Ford allows for DIY programming if you have two already programmed administrator keys.
Refer to your Ford F150 owner’s manual for specific instructions on how to program a new key fob using two existing keys. There are also numerous online videos and guides available that can walk you through this process.
Once your new fob is programmed and tested, you can proceed with the shell replacement.
Step 2: Disassembling the Original Key Fob
This step requires patience and care to avoid damaging the electronic components inside your key fob.
-
Remove the Battery Cover: Locate the small indentation on the back of your key fob shell. Use your fingernail or a small tool to gently pry off the battery cover. Remove the battery and set it aside.
-
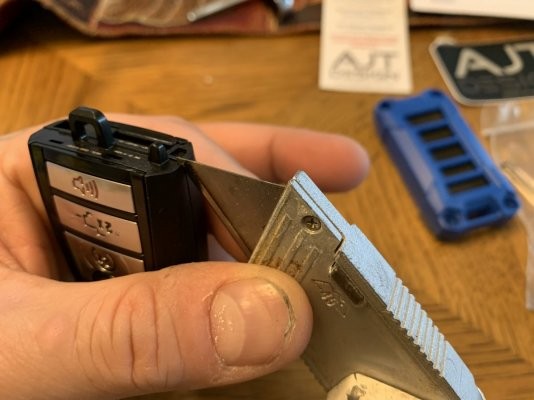
Carefully Separate the Shell Halves: This is the most delicate part. The original key fob shell is typically glued together. Using your sharp utility blade or a thin flathead screwdriver, begin to gently wedge it into the seam running around the perimeter of the key fob.
Start slowly and patiently work your way around the seam. Apply gentle pressure and avoid forcing it, as you could damage the internal circuit board. Multiple passes with the blade along the seam will gradually cut through the adhesive.
-
Separate the Halves: Once you’ve worked your way around the entire seam, the two halves of the key fob shell should begin to separate. You may need to gently pry them apart. Be cautious as you separate them, as the circuit board is loose inside and could fall out.
-
Extract the Circuit Board: Carefully remove the circuit board from the old key fob shell halves. Set it aside in a safe place, handling it by the edges to avoid static discharge.
Step 3: Assembling the New Key Fob Shell
Now that you have the circuit board removed, you can assemble it into your new key fob shell.
-
Insert the Buttons: Place the button pads into the front half of your new key fob shell. Most aftermarket shells are designed to be universal, but ensure the buttons align correctly with the button positions on your circuit board.
Some kits come with different button options, such as colored panic buttons, allowing for a customized look.
-
Place the Rubber Gasket (if included): Some replacement shells include a rubber gasket that sits over the buttons on the inside of the front shell half. This gasket helps to seal the buttons and provide a more solid feel. Place the gasket over the buttons, ensuring it is seated correctly and flush.
-
Insert the Circuit Board: Carefully place the circuit board into the back half of the new key fob shell. Ensure it sits snugly in the designated space and aligns with the button pads in the front half.
-
Close the Shell: Align the front and back halves of the new key fob shell and press them firmly together until they snap closed. Ensure there are no gaps and the shell feels securely closed.
-
Reinstall Battery and Battery Cover: Insert the battery back into its compartment, ensuring correct polarity. Replace the battery cover.
Final Checks and Tips for Success
- Test Your Key Fob: After reassembly, test all the buttons on your key fob to ensure they are functioning correctly. Lock, unlock, panic button, and remote start (if applicable) should all be tested.
- Double Check Shell Security: Ensure the new key fob shell is fully closed and secure. A well-sealed shell will protect the electronics from dust and moisture.
- Consider a Key Fob Case: To further protect your newly replaced key fob shell and extend its lifespan, consider using a protective key fob case or cover.
Replacing your 2017 Ford F150 key fob shell is a rewarding DIY project that can refresh the look and feel of your key fob. By following these steps and taking your time, you can successfully complete this replacement and enjoy a like-new key fob shell.