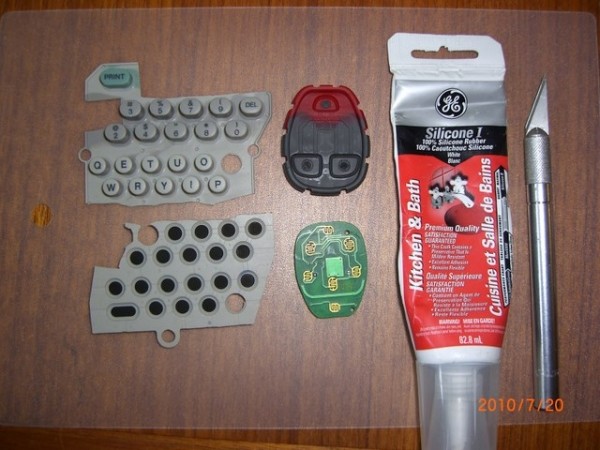
Is your car key fob becoming increasingly unresponsive? Do you find yourself pressing the buttons multiple times just to lock or unlock your doors? Over time, the internal buttons of your key fob, often made with a conductive carbon coating, can wear out. Instead of immediately replacing the entire key fob and facing potential programming costs, consider a simple and effective do-it-yourself (DIY) refurbishment. This guide will walk you through how to perform a Key Fob Refurbishment, breathing new life into your existing remote and saving you time and money.
This method is particularly effective when cleaning the circuit board and button contacts no longer resolves the issue of unresponsiveness. If you’re tired of repeatedly pressing your key fob buttons, this refurbishment could be the solution you need. Remember, attempting this repair is at your own risk, but many users have found it to be a successful alternative to purchasing a new key fob.
Before starting, ensure that the issue isn’t related to battery connection problems. If you suspect a faulty battery connection, you can refer to guides specifically addressing battery solder joint repairs. However, if your battery connections are solid and the problem lies with button responsiveness, proceed with this key fob refurbishment guide.
Materials You’ll Need for Key Fob Refurbishment
To begin your key fob refurbishment, gather the following readily available materials:
- Your worn-out key fob remote – the patient for this repair!
- A very sharp razor blade or Exacto knife – for precise cutting.
- 100% Silicone sealant – GE Silicone 1 or similar (avoiding crazy glue or gorilla glue as they may not adhere well to the silicone keypad).
- A toothpick – for precise application of the silicone.
- A donor silicone keypad – This can be salvaged from an old, unused remote control (TV remote, electronic device remote, etc.). The key is to have access to spare silicone buttons.
Step-by-Step Key Fob Refurbishment Process
Follow these steps carefully to refurbish your key fob buttons:
Step 1: Disassemble Your Key Fob
Carefully take apart your key fob remote. Lay out all the components neatly on a clean surface, ensuring you don’t lose any small parts. This organized approach will make reassembly much easier.
Step 2: Prepare a Replacement Button from the Donor Keypad
From your salvaged silicone keypad, select a button that is similar in size and thickness to the ones on your key fob. Using your razor blade or Exacto knife, carefully cut out this button.
Step 3: Thin Down the “Carbon” Layer of the Replacement Button
Now, take the button you just cut out and trim off the “carbon” or conductive part from the back. The goal is to create a very thin layer of this conductive material backed by a bit of the silicone. Cut thinly, aiming to retain just a thin layer of the gray/white silicone backing the conductive “carbon”.
This image provides a closer look at the desired thickness – thin but not fragile, with the conductive layer intact:
Step 4: Remove Worn Buttons and Prepare the Key Fob Indentation
This step requires some finesse. Carefully remove the original, worn-out “carbon” buttons from your key fob remote. Gently push from the opposite side of the keypad to make the button protrude slightly, allowing for a clean cut with your razor blade.
Once the old button is removed, carefully trim the indentation where the button was located, making the recess slightly deeper. This is necessary because the new replacement button might be a bit thicker than the original.
After deepening the indentations, trim your new replacement buttons to ensure they fit snugly within these recesses.
Step 5: Attach the New Refurbished Buttons with Silicone
Using your toothpick, apply a very small drop of silicone sealant into the prepared indentation. Carefully place one of your replacement buttons into the silicone, pressing it down squarely. Immediately clean off any excess silicone that squeezes out around the button. Crucially, avoid getting any silicone on the conductive surface of the new button – this could interfere with its function. If this happens, remove the button, clean the area, and use a fresh replacement.
Allow the silicone to set for a couple of minutes before repeating the process for the other button, being careful not to disturb the first one you’ve just placed.
Step 6: Allow Sufficient Drying Time
Let the silicone dry and cure completely for at least a couple of hours, and ideally overnight. This ensures a strong bond and prevents the buttons from shifting during use.
Step 7: Reassemble and Test Your Refurbished Key Fob
After the drying period, clean the contacts on the circuit board using isopropyl alcohol and a lint-free cloth. Reassemble your key fob remote carefully. Go to your car and test the buttons.
If the refurbishment is successful, your key fob should now respond reliably with each press. If you encounter issues, disassemble the key fob again and inspect the button contact surfaces and the circuit board for any silicone residue or misalignment.
In the event of a major mishap, remember that you can always purchase a new key fob and potentially swap the silicone keypads to avoid the new remote programming process in some cases.
This key fob refurbishment method offers a practical and cost-effective way to extend the life of your car remote. Good luck with your repair!
