Is your car key fob driving you crazy? Do you have to press the buttons multiple times, sometimes up to 30 times, just to lock or unlock your doors? If cleaning the inside of your key fob remote isn’t solving the problem, worn-out carbon buttons are likely the culprit. Don’t rush to buy a new, expensive remote and go through the hassle of programming it. You can Fix Key Fob issues yourself with this simple DIY repair.
This guide provides a step-by-step solution to replace those unresponsive carbon buttons and restore your key fob to its former glory. This fix has worked for many, saving them time and money. However, please proceed at your own risk. If you’re not comfortable with DIY repairs, seeking professional help might be a better option. We assume your battery connections are solid; if battery issues are suspected, check out this guide on cold solder repair for key fobs.
Materials You’ll Need to Fix Your Key Fob:
Before you begin to fix key fob buttons, gather these materials:
- Your malfunctioning key fob remote
- A sharp razor blade or Exacto knife for precise cutting
- 100% Silicone sealant – GE Silicone 1 is recommended for its adhesive properties on silicone keypads
- A toothpick for applying the silicone neatly
- A donor silicone keypad from an old remote (TV remote, electronic device remote, etc.)
Step-by-Step Guide to Fix Key Fob Buttons:
Follow these steps carefully to fix key fob button problems and breathe new life into your car remote.
Step 1: Disassemble Your Key Fob
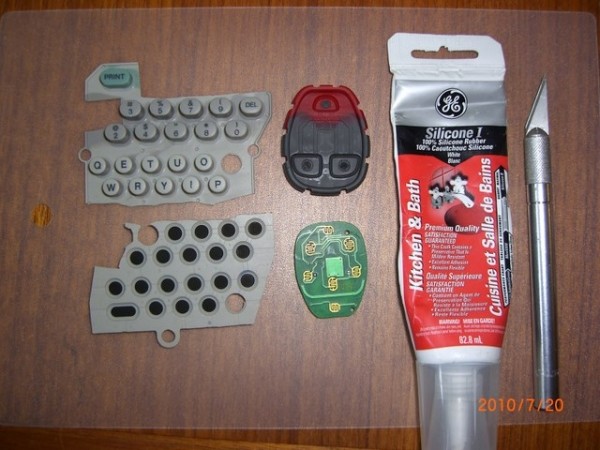
Carefully take apart your key fob remote. Lay out all the components along with your tools and materials on a clean workspace. This will help you keep track of everything during the repair process to fix key fob effectively.
Alt Text: Components of a disassembled car key fob remote laid out on a workbench alongside necessary repair tools like a razor knife, silicone sealant, toothpick, and a donor silicone keypad, preparing for a DIY key fob button repair.
Step 2: Prepare the Replacement Button
From your salvaged silicone keypad, select a button and carefully cut it out using your razor blade or Exacto knife. Choose a button that is similar in size or slightly larger than the worn button on your key fob to ensure a good key fob repair.
Alt Text: Close-up shot of a razor knife precisely cutting out a single rubber button from a salvaged silicone keypad, demonstrating the preparation of a replacement button for a key fob repair project.
Step 3: Thin Down the Replacement Button
Using your razor knife, carefully trim the carbon contact from the back of the button you just cut out. Aim to make it thin, leaving just a very thin layer of the gray/white silicone backing to support the carbon. This step is crucial to ensure the button fits and functions correctly when you fix key fob.
Alt Text: A hand holding a small, trimmed silicone button replacement, showing the thin carbon contact layer after being carefully sliced with a razor knife for key fob button repair.
Alt Text: Side view macro shot illustrating the desired thinness of a trimmed silicone button replacement piece, emphasizing the thin layer of carbon intended for effective key fob button functionality.
Step 4: Remove and Prepare the Key Fob Button Indentation
Now, carefully remove the original worn-out carbon buttons from your key fob remote. Push from the back side of the keypad to make the button protrude slightly, allowing for a clean cut with your razor knife. Once removed, trim the indentation where the old button was seated to slightly deepen the recess. This extra space will accommodate the new, slightly thicker replacement button when you fix key fob. Trim your new button replacements to precisely fit these indentations.
Alt Text: Image showcasing the key fob remote keypad with the original worn buttons removed, alongside the newly trimmed silicone replacement buttons ready for installation into the deepened indentations for a successful key fob repair.
Step 5: Apply Silicone and Insert New Buttons
Using the toothpick, apply a tiny drop of silicone sealant into the prepared indentation on the key fob keypad. Carefully place one of your replacement buttons into the silicone, pressing it down squarely. Immediately clean off any excess silicone that squeezes out. Crucially, avoid getting any silicone on the working carbon surface of the new button. If this happens, discard that button, make a fresh one, and apply it instead. Let the silicone set for a couple of minutes before repeating this step for the remaining buttons.
Alt Text: Close-up view of a toothpick applying a small amount of silicone adhesive into the key fob button indentation, with a replacement silicone button being carefully placed into the recess for key fob button restoration.
Step 6: Allow Drying Time
Let the silicone dry completely. It’s recommended to allow at least two hours, but ideally overnight, to ensure a strong bond before you reassemble the key fob. This drying time is essential for a durable key fob repair.
Step 7: Reassemble and Test Your Repaired Key Fob
Clean the contacts on the circuit board with rubbing alcohol and a lint-free cloth. Reassemble your key fob remote carefully. Go to your car and test the buttons. If everything went well, your key fob should now work with a single, firm press!
If it doesn’t work immediately, disassemble the key fob again and carefully inspect the carbon button surfaces and the circuit board for any silicone residue or misalignment that might be hindering contact.
In a worst-case scenario, if this DIY attempt doesn’t fully fix key fob issues, remember you can always purchase a new remote. You might even be able to swap the silicone keypad from your old, repaired remote into the new one to potentially save on programming costs in some cases.
Good luck with your key fob repair!