Experiencing issues with your BMW 2012 key fob, especially in cold weather? A common culprit is a low battery. If you’ve noticed your key fob struggling to lock or unlock your doors remotely, or if your BMW is not saving your personalized settings when starting after a cold spell, it might be time for a battery replacement. This guide will walk you through replacing the battery in your BMW 2012 key fob yourself, saving you time and money compared to dealership service.
Step 1: Gather Your Materials
Before you begin, ensure you have the necessary tools and the correct replacement battery. You will need:
- New VL2020 Battery: This is the specific battery type required for most BMW key fobs of this era. Ensure you purchase a genuine VL2020 battery, paying attention to the terminal orientation as it’s slightly offset. You can find these online from reputable retailers.
- Sharp X-Acto Knife: A sharp blade is crucial for carefully opening the glued key fob casing.
- Non-metallic Pry Tool: A credit card or plastic pry tool will help to gently lift the old battery without damaging the internal components.
- Soldering Iron: A soldering iron is needed to desolder the old battery and solder in the new one.
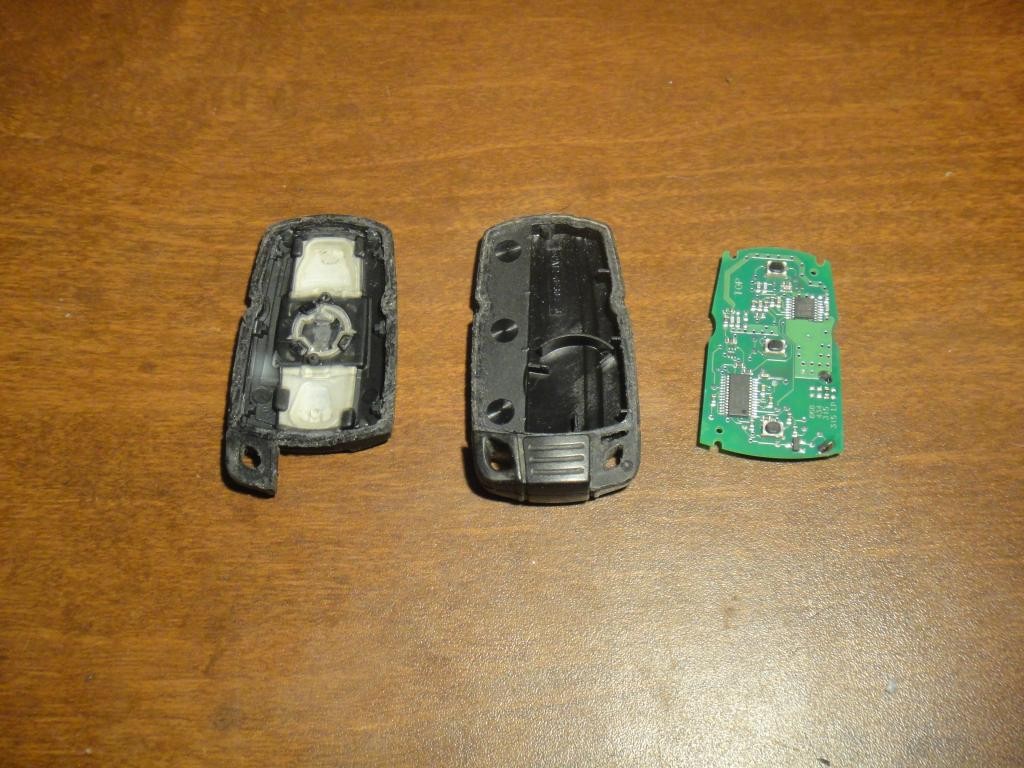
Step 2: Carefully Open the Key Fob Casing
The BMW key fob is designed to be sealed, meaning it’s glued shut. Take your time and use a sharp X-Acto knife to carefully cut along the seam of the key fob. It’s essential to apply gentle pressure and avoid cutting too deep to prevent damage to the internal circuit board (PCB) located just beneath the plastic casing. Work slowly around the entire perimeter of the fob until you can gently pry it open.
Step 3: Desoldering the Old Battery
With the key fob open, you’ll see the battery soldered to the PCB. Use a non-metallic pry tool, like a credit card, to gently apply a small amount of upward tension to the battery. Focus on the corner terminal first, as it’s easier to access. Apply heat with your soldering iron to the corner terminal solder joint to desolder it. Once the corner is free, you can desolder the remaining terminal. Starting with the corner terminal is recommended because the middle terminal has a longer lead, making it harder to get under and apply tension initially.
Step 4: Soldering in the New VL2020 Battery
Place the new VL2020 battery into the battery holes on the PCB, ensuring correct polarity and orientation. Hold the PCB by its edges and gently push the battery down into place. Apply heat to the middle terminal first, then the corner terminal, allowing the battery terminals to push through the existing solder and settle into position. Ensure a good solder joint for a reliable connection.
Step 5: Test and Reassemble Your Key Fob
Before permanently sealing the key fob, dry fit the PCB back into the housing and test all key functions: locking, unlocking, and starting your BMW. If everything works correctly, congratulations! You’ve successfully replaced your Bmw 2012 Key Fob Battery. If not, double-check your soldering and battery orientation.
For reassembly, you have a couple of options. You can purchase a new replacement key fob housing for a fresh look. Alternatively, you can simply glue the original housing back together. If choosing to glue, use a gel-type cyanoacrylate glue sparingly to avoid it running and potentially gluing the PCB to the housing. Apply glue to the edges of the casing and carefully press the two halves together until they are securely bonded.
By following these steps, you can easily replace your BMW 2012 key fob battery and restore its functionality, ensuring you’re not left out in the cold.