Is your BMW 3 Series key fob acting up, especially when the temperature drops? You’re not alone. Many BMW owners experience issues with their key fobs in cold weather, where it might fail to lock or unlock the doors. You might even get into your car, start the engine, only to find your personalized settings like radio presets are missing. This is often a sign of a dying key fob battery. Before you rush to the dealership and spend a hefty sum, you can easily tackle this problem yourself. This guide will walk you through a simple and effective DIY Bmw 3 Series Key Fob Battery Replacement.
This guide is inspired by the experience of a user in a cold climate (-40C) who faced similar key fob issues. We’ll show you how to replace the battery and bring your key fob back to life, ensuring you regain full functionality and those precious personalized settings. Forget those “how-not-to-do-it” guides; we’ll provide clear, step-by-step instructions.
Step 1: Procure the Correct Battery
First and foremost, you need the right battery. BMW key fobs typically use a VL2020 lithium-ion rechargeable battery. It’s crucial to note the orientation of the terminals on your old battery before ordering a new one, as they are often offset at approximately 90 degrees.
You can find replacements online. A reliable option is available at online marketplaces like eBay. Make sure to search for a “VL2020 battery for BMW key fob” to ensure compatibility.
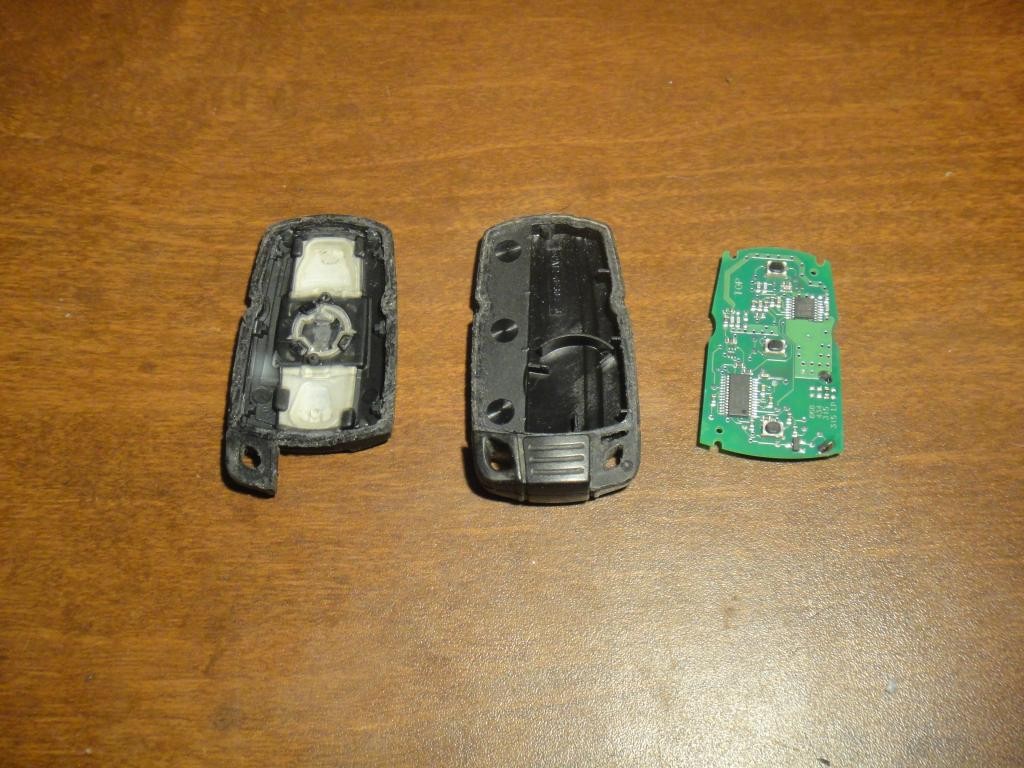
Step 2: Carefully Open the Key Fob Casing
BMW key fobs are notoriously sealed shut with strong adhesive. Patience and the right tools are key here. You’ll need a sharp X-acto knife or a similar precision cutting tool.
- Take your time: Work slowly and methodically around the seam of the key fob.
- Shallow cuts: Avoid cutting too deep, as you risk damaging the delicate Printed Circuit Board (PCB) inside.
- Go around the perimeter: Gradually work your way around the entire fob until you can gently pry it open.
Step 3: Desolder and Remove the Old Battery
Once the fob is open, you’ll see the PCB with the battery soldered in place. Desoldering requires a bit of finesse.
- Non-metallic pry tool: Use a credit card or a plastic pry tool to gently apply a small amount of upward pressure to the battery. Avoid using metal tools to prevent shorts or damage to the PCB.
- Desolder corner terminal first: Focus on desoldering one corner terminal of the battery first. This is generally easier as the other terminal is often more centrally located and harder to access initially. Applying slight tension with your pry tool while heating the solder joint will help release the terminal.
- Heat and lift: Apply heat to the solder joint of the corner terminal using a soldering iron. Once the solder melts, gently lift that corner of the battery. Repeat for the remaining terminal(s) until the battery is free.
Step 4: Solder in the New VL2020 Battery
Now it’s time to install the new battery.
- Position the new battery: Place the new VL2020 battery into the battery holes on the PCB, ensuring correct polarity (match the orientation of the old battery).
- Hold and apply gentle pressure: Hold the PCB by its edges and gently press down on the new battery to ensure the terminals protrude through the solder holes.
- Solder the terminals: Apply heat to the battery terminals from the solder side of the PCB. The existing solder will melt and secure the new battery in place. Start with the center terminal and then solder the corner terminal for easier handling. Ensure a good solder joint for a reliable connection.
Step 5: Test and Reassemble Your Key Fob
Before permanently sealing the key fob, it’s crucial to test if the replacement was successful.
- Dry fit and test: Place the PCB back into the key fob housing without gluing it shut.
- Test key functions: Try locking and unlocking your BMW 3 Series, and start the engine. Check if your personalized settings are restored.
- Troubleshooting (hopefully not needed!): If everything works correctly, congratulations! If not, double-check your soldering connections and battery polarity. If issues persist, professional help might be needed, but hopefully, this guide has solved your problem.
Step 6: Seal the Key Fob Casing
You have a couple of options for reassembling the key fob:
- New Housing: For a pristine look, you can purchase a new replacement housing for your BMW key fob. This will require transferring the internal components to the new casing.
- Glue it Shut: If you’re prioritizing practicality, you can simply glue the original housing back together. Use a gel-type cyanoacrylate glue (super glue) sparingly. Gel-type glue is less likely to run and seep into unwanted areas. Apply a thin bead along the seam and carefully press the two halves of the fob together until the glue sets. Be careful not to glue the PCB to the housing itself.
Conclusion: Enjoy Your Revived BMW Key Fob
You’ve successfully completed your BMW 3 Series key fob battery replacement! By following these steps, you’ve saved yourself time and money and gained the satisfaction of DIY car maintenance. No more struggling with a weak or unresponsive key fob, especially in cold weather. Enjoy the convenience and restored functionality of your BMW key fob, along with your personalized settings. This simple repair can make a big difference in your daily driving experience.