Do you find yourself accidentally setting off your car alarm or popping the trunk when your key fob is just in your pocket? Many car owners, especially those with Ford models from the early to mid-2010s, have experienced the frustration of an overly sensitive key fob. If your key fob reacts to the slightest touch, triggering functions unintentionally, you’re not alone. Luckily, this is a common issue with a relatively simple fix that you can do yourself at home.
This guide, brought to you by the auto repair experts at keyfobx.com, will walk you through the steps to address this key fob sensitivity problem. We’ll show you how to open your key fob, identify the cause of the hyper-sensitivity, and perform a quick modification to restore your key fob to its proper function. No more accidental alarms or surprise trunk openings!
What Makes Your Key Fob Too Sensitive?
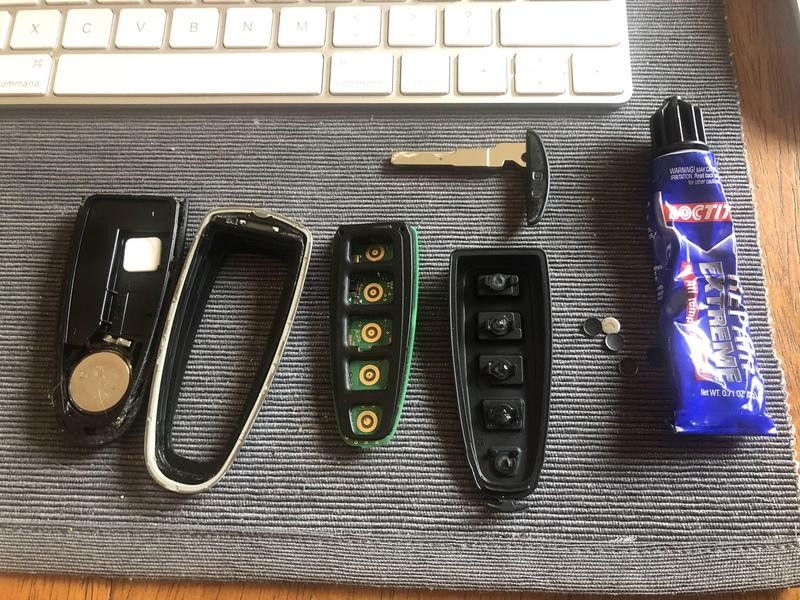
The culprit behind an overly sensitive key fob often lies within the button assembly itself. Inside your key fob, beneath the rubber buttons, are small metal discs. These discs are designed to make contact with the circuit board when you press a button, activating the desired function (lock, unlock, trunk, panic, etc.). Over time, the adhesive holding these metal discs in place can weaken. When these discs become loose or detach completely, they can move around inside the fob. This movement can cause them to make unintended contact with the circuit board, leading to the hyper-sensitive behavior you’re experiencing.
Step-by-Step Key Fob Repair
Here’s how to fix your overly sensitive key fob in a few simple steps:
1. Open the Key Fob:
- Locate the valet key release switch on your key fob. Typically, this is a small button or slider.
- Remove the valet key.
- Once the valet key is removed, you’ll see a small slot or seam where you can pry open the key fob casing. You can use a small flat-head screwdriver or even the edge of the valet key itself to gently pry the two halves of the fob apart. Be careful not to apply excessive force to avoid damaging the plastic casing.
2. Access the Button Assembly:
- Carefully separate the two halves of the key fob.
- You’ll see the internal components, including the circuit board and the rubber button pad.
- Gently remove the rubber button pad. It should lift out easily.
3. Inspect the Metal Discs:
- Turn the rubber button pad over to examine the back of the buttons.
- You should see small metal discs adhered to the back of each button.
- Check if any of these discs are loose or missing. In many cases of overly sensitive fobs, some discs will have detached and may be loose inside the key fob casing. This is the primary cause of the sensitivity issue.
4. Modify the Button Pad (Optional but Recommended):
- To prevent this issue from recurring, you can modify the button pad slightly.
- Use fingernail clippers to carefully clip off the small center nub that protrudes from the back of each button on the rubber pad. These nubs are what the metal discs were originally glued to. Removing them helps ensure the discs stay in place more securely when re-glued.
- Clean off any old adhesive residue from both the rubber button pad and the metal discs.
5. Reattach the Metal Discs:
- Using a small amount of repair adhesive like Loctite repair adhesive, carefully glue the metal discs back onto the center of the buttons on the rubber pad.
- For buttons you frequently use (lock, unlock, trunk), ensure the metal discs are securely reattached.
- Optional Button Disabling: If you rarely or never use certain buttons, like the panic or remote start button, you can choose not to reattach the metal discs to those specific buttons. This effectively disables those buttons, further reducing the chance of accidental activation.
6. Consider Battery Replacement:
- While you have the key fob open, it’s a good opportunity to replace the battery, especially if you don’t know when it was last changed.
- The key fob for these Ford models typically uses a CR-2032 battery.
Reassembly and Testing
7. Reassemble the Key Fob:
- Carefully place the rubber button pad back into its position on the circuit board.
- Align the two halves of the key fob casing and snap them back together until they are securely closed.
- Reinsert the valet key.
8. Test Your Key Fob:
- Test all the buttons on your key fob to ensure they are functioning correctly.
- The buttons you re-enabled should now require a deliberate press to activate, and the sensitivity issue should be resolved.
- If you chose to disable any buttons, confirm they no longer trigger any function.
Important Notes and Compatibility
This DIY fix is particularly relevant for Ford models from the 2011-2018 era that use the Ford Smart Key remote with FCC ID M3N5WY8609 and OE part number 164-R8091. This includes models such as:
- Ford Escape
- Ford C-Max
- Ford Focus
- Ford Flex
- Ford Explorer
- Ford Expedition
- Ford Taurus
The circuit board inside may be stamped with “Continental 1408-2” and “94V-0”.
By following these steps, you can likely resolve the issue of an overly sensitive car key fob and regain control over your keyless entry system. Enjoy a less stressful experience, free from accidental car alarms and trunk openings! For more car key fob repair guides and information, visit keyfobx.com – your trusted source for automotive key solutions.
