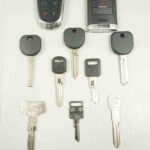
Have you ever looked at your GMC key fob and wondered what’s inside or perhaps needed to swap out the battery or even replace the case? Many GMC owners find themselves wanting to access the internals of their key fobs for various reasons. Whether you’re aiming to replace a worn-out case, switch the circuit board to a more stylish fob, or simply replace the battery, knowing how to safely open your GMC key fob is a handy skill. This guide will walk you through the process of opening your GMC key fob without damaging it, saving you a trip to the dealership and potential programming fees.
Tools You’ll Need
Before you begin, gather these simple tools to make the process smooth and damage-free:
- #0 Philips Screwdriver: A small Philips head screwdriver, size #0, is crucial for accessing internal components without stripping any screws.
- Small Flat Blade Screwdriver (m1.8 or similar): A tiny flat blade screwdriver, around m1.8 in size, will be used for prying open certain parts of the fob, especially the newer chrome edged versions.
- Penny or Thin Plastic Pry Tool: A penny or a thin plastic pry tool is perfect for safely separating the key fob’s back cover without causing scratches.
Step-by-Step Guide to Opening Your GMC Key Fob
Follow these detailed steps to carefully open your GMC key fob. These instructions are applicable for many GMC models, including Sierra and Yukon, especially those around the 2014-2015 year range and similar designs.
Step 1: Prepare Your Old Key Fob
Start with the key fob you wish to open. The first step is to remove the back cover and the battery.
-
Use a Penny to Open the Back: Insert the edge of a penny into the seam located on the side of your key fob. Gently twist the penny to pry the back cover open. A penny’s edge is ideal as it’s sturdy enough to pry but soft enough to minimize scratches on the plastic. You can also use a thin plastic pry tool if you prefer.
-
Remove the Battery: Once the back cover is off, you’ll see the battery. Carefully remove the battery. Take note of the battery orientation for when you need to replace it later.
Alt Text: Using a penny to pry open the back cover of a GMC key fob to access the battery compartment.
Alt Text: Close-up of removing the small circular battery from an opened GMC key fob, preparing for disassembly.
Step 2: Separate the Old Fob Housing
With the battery removed, the next step is to separate the two halves of the key fob housing to access the internal circuit board.
-
Locate the Small Holes: Turn the key fob over, and you’ll notice small holes on the back casing. These are strategically placed to allow you to separate the housing halves.
-
Use a #0 Philips Screwdriver: Insert the tip of your #0 Philips screwdriver into one of these holes. Apply firm, gentle pressure straight in – avoid twisting. You should feel the edge of the housing pop open slightly.
-
Repeat on the Other Hole: Repeat this process in the other hole. Once both sides are popped, you should be able to easily pull the housing apart with your fingers.
-
Remove the Circuit Board: Turn the housing over and gently shake it. The internal circuit board is not fastened and should simply fall out. Set all these parts aside carefully.
Alt Text: Using a small Philips head screwdriver to push into the designated hole on a GMC key fob casing to separate the housing.
Alt Text: Two halves of a disassembled GMC key fob casing with the circuit board exposed, ready for removal.
Step 3: Opening the New Fob (Chrome Edging)
If you are working with a newer or different style of GMC key fob, especially one with chrome edging, the opening process is slightly different and requires extra care. This step is crucial to avoid damage, particularly to the chrome trim.
-
Identify the Chrome Edging: Notice the chrome pieces on the sides of the new key fob. Unlike some older models, these chrome pieces are often solid and not split, which means they hold the case halves together more firmly.
-
Pry the Chrome Edging Carefully: Turn the new fob face down. Using your small flat blade screwdriver (m1.8 or similar), carefully insert the blade under the chrome edging in the specific area shown in the image. Gently pry one end of the chrome piece loose.
-
Hold and Release: Once one end is loose, hold it firmly to prevent it from snapping back into place. Remove the screwdriver and gently pry the other end of the same chrome piece off. Once both tabs are released, the chrome edging can be pulled free.
-
Repeat for the Other Side: Repeat this process for the chrome edging on the opposite side of the key fob.
-
Separate the Housing Halves: After removing both chrome edgings, you will see small plastic tabs along the edges of the case. Use your flat blade screwdriver to gently pry these tabs back. This will allow you to pull the two halves of the housing apart.
Alt Text: Carefully prying the chrome trim from a GMC key fob using a small flathead screwdriver to access the housing tabs.
Step 4: Final Assembly
With both the old and new key fob housings open, the final step is to transfer the programmed circuit board and reassemble.
-
Transfer the Circuit Board: Take the circuit board from your old key fob and place it into the new key fob housing.
-
Snap the Housing Back Together: Align the two halves of the new key fob housing and gently snap them back together. If you removed chrome pieces, ensure you reattach them firmly until they click into place.
-
Reinstall the Battery and Back Cover: Place the battery back into the new fob, ensuring it’s in the correct orientation. Then, snap the back cover back onto the key fob until it’s securely closed.
-
Test Your New Fob: Test all the buttons on your newly assembled key fob to ensure everything is working correctly. It should function just like your original fob, but now with a potentially upgraded or new case.
Alt Text: A successfully assembled GMC key fob with an upgraded case, showcasing the result of the key fob opening and component swapping process.
Conclusion
Opening your GMC key fob is a straightforward process that can be accomplished with just a few simple tools and a bit of carefulness. Whether you’re replacing a battery, swapping cases, or just curious about the inner workings, this guide provides you with the steps to safely access the inside of your GMC key fob. By following these instructions, you can avoid unnecessary dealership costs and confidently handle basic key fob maintenance yourself. Enjoy your refreshed or upgraded GMC key fob!