Is your Honda key fob displaying a low battery warning? Don’t worry, replacing the battery in your Honda key fob is a straightforward task you can easily do yourself. This guide provides a detailed, step-by-step walkthrough to help you replace your Honda key fob battery quickly and efficiently, saving you time and money.
Before we begin, it’s important to understand why timely battery replacement is crucial. A weak battery can lead to inconsistent performance of your key fob, potentially causing you to get locked out of your car or unable to start it remotely. Keeping your key fob in top condition ensures seamless access and operation of your Honda vehicle.
This guide is designed to be comprehensive and user-friendly, even if you’re not a car expert. We’ll cover everything from identifying the tools you’ll need to the final steps of testing your newly powered key fob. Let’s get started and ensure your Honda key fob is always ready when you need it.
Tools You’ll Need
Before you begin the battery replacement process, gather these simple tools:
- New CR2032 Battery: This is the standard battery type for most Honda key fobs. You can find these batteries at most drugstores, supermarkets, and online retailers. Consider buying a multipack to have spares for future replacements or your second key fob.
- Small Flathead Screwdriver or Emergency Key: A small flathead screwdriver will be helpful for gently prying open the key fob and removing the old battery. Alternatively, as we’ll explore, your Honda key fob’s emergency key can also be used for opening the case, often more safely and without risk of scratching.
- Soft Cloth or Microfiber Cloth (Optional): If you choose to use a coin to open the fob, wrapping it in a soft cloth can help prevent scratches on your key fob casing. However, using the emergency key usually eliminates the need for this.
Having these tools ready will make the battery replacement process smooth and efficient.
Step-by-Step Guide to Replacing Your Honda Key Fob Battery
Follow these detailed steps to replace your Honda key fob battery:
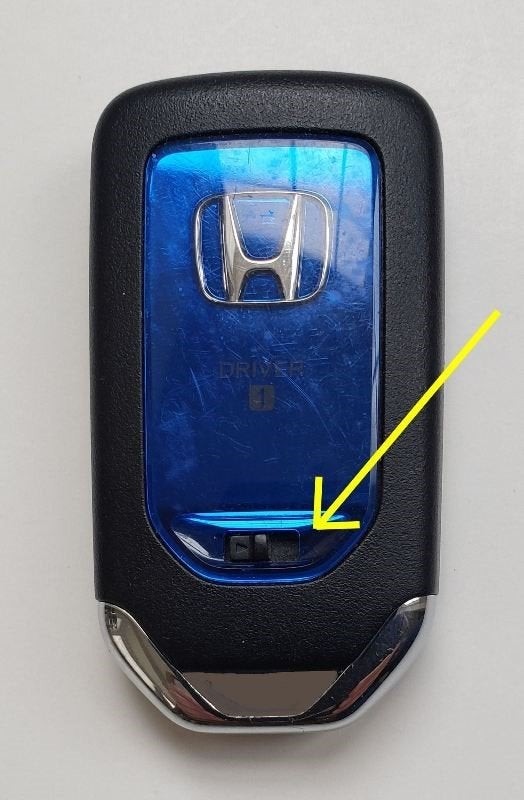
Step 1: Remove the Emergency Key
The first step is to remove the mechanical emergency key from your Honda key fob. Locate the small release button or switch on your key fob, usually on the side or bottom. Slide or press this release to detach and pull out the emergency key. Set the emergency key aside in a safe place.
This emergency key is not just for emergencies; it’s also cleverly designed to help with the battery replacement process.
Step 2: Open the Key Fob Casing
With the emergency key removed, you’ll now access the key fob casing. Locate the small slots or tabs where the two halves of the key fob meet. These are usually visible after removing the emergency key.
Instead of using a coin as suggested in some manuals, the emergency key itself is perfectly sized to fit into these slots. Insert the tip of your emergency key into one of the slots. Gently twist or pry to separate the two halves of the key fob casing. You may hear a click as the case begins to open. Work your way around the seam, gently prying until the case is fully split into two parts.
Step 3: Access and Remove the Old Battery
Once the key fob is open, you’ll see the circuit board and the CR2032 battery. The battery is typically held in place by small retaining clips.
Carefully observe the battery orientation before removal – note which side is facing up (+ side). Using your small flathead screwdriver, or even your fingernail, gently pry under the edge of the battery to lift it out of its housing. Be careful not to damage the circuit board or dislodge any other components. It’s best to lay the fob flat on a surface during this step to prevent accidental button displacement.
Step 4: Insert the New CR2032 Battery
Take your new CR2032 battery and install it in the key fob. Ensure you are inserting it with the correct polarity – the positive (+) side should usually face upwards, matching the orientation of the battery you just removed. Slide one edge of the battery under the retaining clips and then press down on the other side until it snaps securely into place.
Step 5: Reassemble the Key Fob Casing
Carefully align the two halves of the key fob casing back together. Press them firmly until they snap back into place. Start by aligning one end and then gradually press along the edges to ensure a tight and secure closure. You should hear a clicking sound as the case pieces lock together.
Step 6: Test Your Key Fob
Finally, test your Honda key fob to ensure the new battery is working correctly. Press the lock, unlock, and panic buttons to verify that your car responds as expected. You should no longer see the low battery warning on your car’s dashboard.
Tips for a Smooth Battery Replacement
- Work on a Clean Surface: Choose a clean, well-lit workspace to prevent losing any small parts.
- Handle with Care: Key fobs contain delicate electronic components. Handle them gently throughout the process.
- Double-Check Battery Orientation: Ensure the new battery is inserted with the correct polarity to avoid damaging the key fob.
- If You Encounter Resistance: If the key fob casing is difficult to open, double-check that you have removed the emergency key and are prying at the correct location. Avoid using excessive force.
- Consider a Key Fob Cover: To protect your key fob from scratches and wear, consider purchasing a silicone cover. This can help prolong the life and appearance of your key fob.
Conclusion
Replacing the battery in your Honda key fob is a simple maintenance task that any Honda owner can accomplish. By following these steps, you can ensure your key fob remains reliable and avoid the inconvenience of a dead battery. Regular maintenance like this not only saves you money on service costs but also keeps your Honda running smoothly and securely. Enjoy the peace of mind knowing you’ve taken a proactive step in maintaining your vehicle!