Experiencing issues with your BMW 3 Series key fob, especially in cold weather? A common problem, particularly in freezing temperatures as low as -40C, is a failing key fob battery. Symptoms can range from the fob intermittently locking or unlocking your car to losing personalized vehicle settings like radio presets when starting the engine. Before you rush to the dealership for an expensive replacement, you can easily tackle this yourself. This guide provides a detailed, step-by-step process on how to replace the battery in your BMW 3 Series key fob, saving you time and money.
This DIY fix is straightforward and requires minimal tools. Let’s get your key fob working like new again!
Tools and Materials You’ll Need
Before you begin, gather these essential items:
- Replacement Battery: You’ll need a VL2020 lithium-ion rechargeable battery. Ensure you purchase the correct battery with terminals in the right position (approximately 90 degrees offset). You can find these online from reputable sources like this eBay link for reference. Always double-check compatibility with your specific BMW 3 Series model and key fob type.
- Sharp X-Acto Knife or Precision Knife: This is crucial for carefully opening the glued key fob casing. A sharp blade ensures a clean cut and minimizes the risk of damaging internal components.
- Non-Metallic Pry Tool: A credit card, plastic spudger, or guitar pick will work perfectly. Avoid metal tools to prevent short circuits or damage to the circuit board.
- Soldering Iron and Solder: Basic soldering skills are required for this repair. Ensure your soldering iron is heated and ready to desolder and resolder small electronic components.
- Optional: Gel-type Cyanoacrylate Glue (Super Glue): For re-sealing the key fob casing if you choose not to purchase a new housing.
Step-by-Step Battery Replacement Guide
Now, let’s dive into the battery replacement process. Follow these steps carefully to ensure a successful repair.
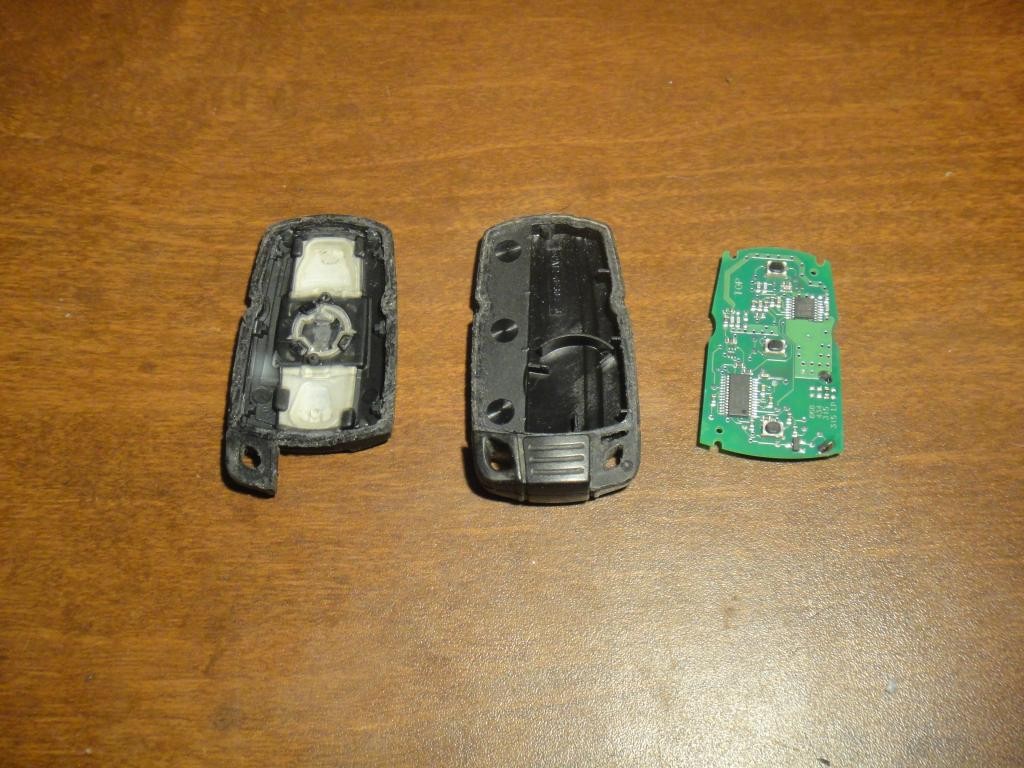
Step 1: Carefully Open the Key Fob Casing
The BMW key fob is designed to be sealed, meaning it’s glued shut. This is the most delicate part of the process, requiring patience and a steady hand.
- Inspect the Fob: Examine the seam where the two halves of the key fob casing meet. This is where you’ll need to cut.
- Start Cutting: Using your sharp X-Acto knife, gently begin to cut along the seam. Apply steady, even pressure. Important: Do not cut too deep! The circuit board (PCB) is located directly beneath the casing. Cutting too deeply will damage the PCB and potentially ruin your key fob.
- Work Around the Seam: Slowly and carefully work your way around the entire seam of the key fob. You may need to make multiple passes with the knife, gradually deepening the cut until the casing begins to separate.
- Separate the Casing: Once you’ve cut through the glue, gently pry the two halves of the casing apart. You might need to insert the tip of your X-Acto knife or a thin plastic tool into the seam to help separate them. Be patient and avoid forcing it open, as this can break the plastic tabs holding the casing together.
Step 2: Desoldering the Old Battery
With the key fob open, you’ll see the circuit board with the battery soldered in place.
- Identify Battery Terminals: Locate the two terminals where the battery is soldered to the PCB. Note their positions for installing the new battery correctly.
- Apply Tension (Non-Metallic Tool): Using your non-metallic pry tool (credit card, plastic spudger), gently apply a small amount of upward tension to the battery. Slide the tool under the edge of the battery, being careful not to damage the PCB.
- Desolder the Corner Terminal: Heat the solder joint of one of the battery terminals (it’s recommended to start with the corner terminal as it’s more accessible). Once the solder melts, use the pry tool to gently lift that corner of the battery.
- Desolder the Second Terminal: Repeat the process for the other battery terminal. The terminal closer to the center of the battery might be slightly harder to access initially, but with the corner terminal desoldered, you should be able to get your soldering iron in place.
- Remove the Old Battery: Once both terminals are desoldered, carefully remove the old battery from the PCB.
Step 3: Soldering the New Battery
Now it’s time to install the new VL2020 battery.
- Position the New Battery: Place the new battery into the battery holes on the PCB, ensuring the terminals align correctly with the solder pads. Double-check the polarity to make sure it matches the original battery’s orientation.
- Secure the Battery: Hold the PCB by its edges and gently press down on the new battery to ensure it is firmly seated in the holes.
- Solder the Middle Terminal: Apply heat to the solder pad of the middle terminal on the PCB. The heat will melt the existing solder, and the battery terminal will push through and make contact. Add a small amount of fresh solder if necessary to ensure a good connection.
- Solder the Corner Terminal: Repeat the soldering process for the corner terminal. Ensure both terminals are securely soldered to the PCB.
Step 4: Test and Reassemble
Before permanently sealing the key fob, it’s crucial to test if the new battery is working.
- Dry Fit and Test: Carefully place the PCB back into the key fob housing halves without gluing them shut.
- Test Key Fob Functions: Go to your BMW 3 Series and test all key fob functions: locking, unlocking, remote start (if applicable), and any other features your key fob supports.
- Verify Personalized Settings: Start your car and check if your personalized settings (radio presets, seat positions, etc.) are now being recognized.
If everything works correctly, congratulations! You’ve successfully replaced the battery in your BMW key fob. If it doesn’t work, double-check your soldering connections and battery orientation. If issues persist, you may need to seek professional help.
Step 5: Re-seal the Key Fob
You have two options for reassembling your key fob:
- New Housing: For a pristine finish, you can purchase a new key fob housing online. These are relatively inexpensive and will make your key fob look brand new. Simply transfer the PCB into the new housing and snap it shut.
- Glue Old Housing: If you prefer to save money and don’t mind a slightly less perfect finish, you can glue the original housing back together. Use gel-type cyanoacrylate glue sparingly along the seam. Gel glue is less likely to run and seep into unwanted areas. Apply a thin bead of glue and carefully press the two halves of the casing together. Hold firmly until the glue sets. Avoid getting glue on the PCB or buttons.
Conclusion
Replacing the battery in your BMW 3 Series key fob is a manageable DIY task that can save you a trip to the dealership and unnecessary expenses. By following these steps, you can restore your key fob’s functionality and ensure you don’t get locked out in the cold or lose your personalized vehicle settings. Remember to take your time, be careful during the casing opening process, and double-check your work for a successful outcome. Enjoy the satisfaction of fixing it yourself!