Upgrade your mundane car key with a touch of bespoke craftsmanship! This guide details the process of creating a Custom Key Fob from hardwood and aluminum, offering a sophisticated and personalized alternative to standard plastic casings. While this project maintains all the original remote functionalities, it primarily serves as a cosmetic enhancement, perfect for breathing new life into a worn-out fob or simply adding a unique flair to your vehicle.
The original key fob, in this instance from a 2010 CRV, was functional but lacked personality. The aim was to transform this ordinary car accessory into a statement piece. The project focuses on replacing the outer shell while preserving the internal electronics, ensuring seamless operation with a refreshed aesthetic.
Disassembling the Original Key Fob
The first step involves carefully disassembling the original key fob. Typically, a small screw and plastic clips secure the housing. Locate and remove the screw, usually found near the key blade base. Gently pry open the plastic shell, taking care not to damage the internal components.
Inside, you’ll find the remote module, often a self-contained unit housing the circuit board and battery. Examine the internal layout to understand how the buttons and key interact with the casing. For this custom key fob project, only the essential bottom piece holding the battery and circuit board will be retained from the original remote internals.
The key blade itself was originally glued into the plastic shell and needed to be carefully separated. For simplicity and to maintain vehicle compatibility, this project reuses the original key blade without modification. Avoid altering the key blade to ensure proper ignition and door lock functionality.
Designing the Custom Key Fob
With the components disassembled, meticulous measurement is crucial. Accurately measure every dimension, nook, and cranny of the original remote and key. This ensures the buttons, indicator lights, and key blade align perfectly within the new custom key fob design. While key fob designs vary across car manufacturers, this measurement-based approach can be adapted to numerous makes and models for creating personalized key fobs.
The design phase allows for creative freedom. In this example, the soft, oval shape of the original fob was replaced with a more angular and robust design. The new design incorporates an aluminum frame for durability and hardwood shells for aesthetic appeal. Two machine screws were planned to secure the assembly, ensuring structural integrity. Precise measurements and careful design planning are paramount to ensure all parts fit together seamlessly.
Machining the Aluminum Frame
The aluminum frame components were machined using a CNC mill, specifically the Lead CNC 1010, and a 1/16″ upcut bit. Aluminum was chosen for its durability, making it ideal for a custom key fob that can withstand daily wear and tear.
Machining aluminum with a small bit is a time-consuming process, taking approximately 4 hours to cut through the 1/4″ plate. However, this slow and steady approach allows for intricate details and clean cuts. Small holes were incorporated into the frame design to enhance epoxy adhesion in later assembly stages.
After machining, the aluminum parts were carefully detached, and any rough edges were smoothed using a file and sandpaper, resulting in clean and refined components ready for assembly.
Crafting the Wooden Shells
For the outer shells of the custom key fob, Chechen wood, a beautiful hardwood, was selected. The wood shells were also machined using the Lead CNC, but the process was significantly faster, taking only around 20 minutes.
Similar to the aluminum parts, the wooden shells underwent a quick cleanup process after machining, ensuring smooth surfaces and precise shapes for a seamless fit.
Finishing and Assembly
To prepare the components for final assembly, screw holes on the wooden shells were recessed using a drill press to accommodate the screw heads.
A chamfer was added to the outer edges of the wooden shells, enhancing the aesthetic appeal and providing a more comfortable feel.
The key blade hole in the aluminum frame was enlarged to allow the M3 screw to pass through freely, while the frame itself was then tapped to receive the screw threads, ensuring a secure mechanical connection.
Epoxy was used to bond the aluminum frame to the top face of the key blade, providing a strong and durable connection. While the long-term durability of epoxy in this application was initially uncertain, it has proven to be robust over several weeks of use. Feedback on alternative bonding methods is welcome for future custom key fob projects.
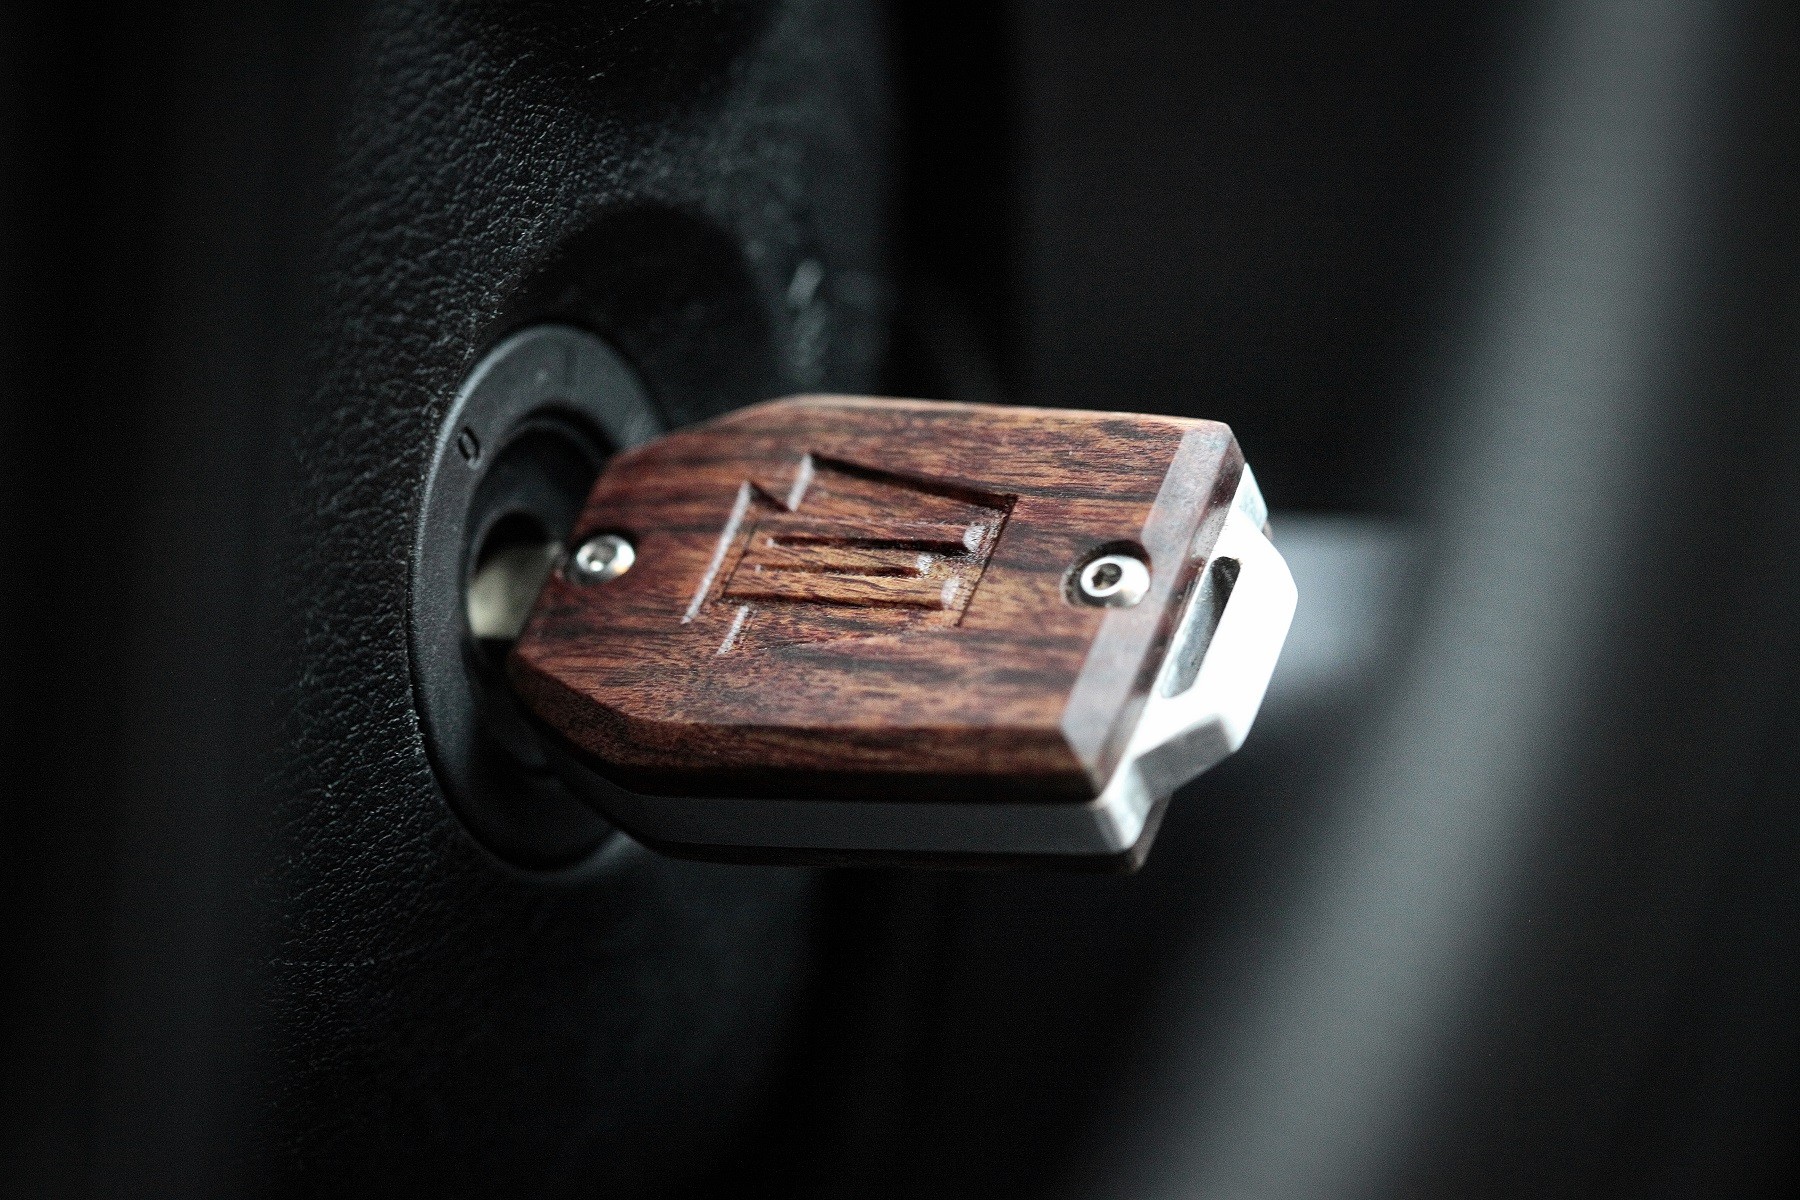
As a final personal touch, a logo was engraved onto the back of the wooden shell using a 90° V-bit, further enhancing the custom key fob‘s unique identity.
With all components finished, assembly was straightforward. The buttons and circuit board were placed into the wooden shell, and the assembly was closed and secured with the two machine screws.
The Finished Custom Key Fob
The transformation is complete! From a mass-produced, generic car key to a one-of-a-kind custom key fob, the result is a personalized automotive accessory that reflects individual style and craftsmanship.
This project demonstrates the potential for personalizing even the most mundane aspects of our daily lives. Exploring further automotive-related projects is on the horizon, inspired by the success of this custom key fob.