Is your car key fob giving you trouble? Do you have to press the buttons multiple times for it to lock or unlock your doors? Like many car owners, you might be experiencing the frustration of worn-out key fob buttons. At keyfobx.com, we specialize in automotive repairs, and we understand how essential a functioning key fob is for your daily convenience. Before you consider replacing the entire unit, which can be costly and require reprogramming, we’re here to guide you through a simple DIY fix. This guide will show you how to repair those unresponsive buttons yourself, potentially saving you time and money.
This repair focuses on addressing the common issue of worn-out “carbon” buttons inside your key fob. Over time, these conductive pads degrade, leading to poor contact and the need for excessive button presses. If cleaning the circuit board and button contacts hasn’t solved your problem, this method offers a more robust solution.
Disclaimer: Please proceed with caution. This is a DIY repair, and while it has proven effective for many, keyfobx.com is not responsible for any damage you may cause to your key fob during this process. If you are uncomfortable with DIY electronics repair, seeking professional help is always recommended.
Materials You’ll Need
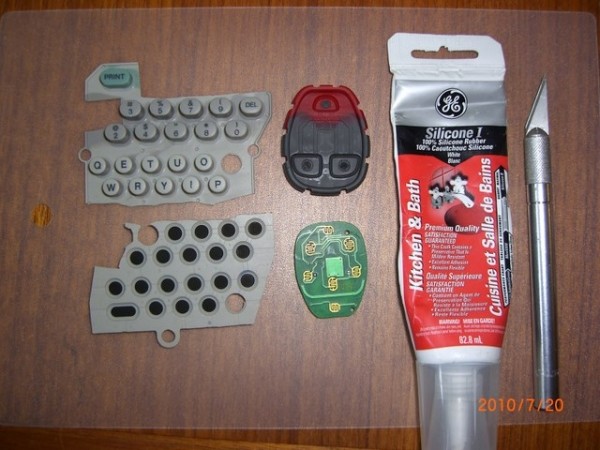
Before you begin, gather these materials:
- Your broken key fob: The patient in our repair process.
- Sharp Razor or Exacto Knife: For precise cutting and trimming.
- 100% Silicone Sealant: We recommend GE Silicone 1. Avoid other adhesives like crazy glue or gorilla glue, as silicone is crucial for adhering to the rubber keypad.
- Toothpick: For applying small, controlled amounts of silicone.
- Silicone Keypad from a Doner Device: An old TV remote or electronic labeller keypad works perfectly as a source of replacement buttons.
Step-by-Step Guide to Fixing Your Broken Key Fob Buttons
Follow these steps carefully to replace the worn-out buttons in your key fob:
Step 1: Disassemble the Key Fob
Carefully take apart your key fob remote. Lay out all the components neatly on a clean surface to keep track of each part.
Step 2: Prepare the Replacement Button
From your salvaged silicone keypad, select a button that is similar in size or slightly larger than the ones on your key fob. Cut out this button from the donor keypad.
Step 3: Trim the “Carbon” Button
Using your razor knife, carefully trim the “carbon” conductive pad from the back of the silicone button you just cut. Aim for a thin slice, ensuring you retain a layer of the silicone backing. This silicone backing will help with adhesion and provide some cushioning.
Step 4: Remove Old Buttons and Prepare the Key Fob Recess
Now, turn your attention to the key fob itself. You need to remove the worn-out “carbon” buttons from the inside of the remote. Gently push each button from the front side of the keypad to make it protrude from the back. Carefully cut off the old button using your razor knife.
Once the old button is removed, slightly deepen the recess where the button was located. This is important because the new replacement button might be a bit thicker than the original. Trimming the indentation ensures the new button sits correctly.
Step 5: Attach the New Button with Silicone
This step requires precision. Use your toothpick to apply a tiny drop of silicone sealant into the recessed indentation in the key fob. Place one of your trimmed replacement buttons into the silicone, ensuring it’s square and properly positioned. Immediately wipe away any excess silicone that squeezes out. Crucially, avoid getting silicone on the conductive surface of the new carbon button or the circuit board contacts.
Let the silicone set for a couple of minutes before moving on to the next button to avoid disturbing the first one.
Step 6: Allow Drying Time
Let the silicone dry completely. It’s recommended to allow at least two hours, but ideally, leave it overnight for the silicone to cure fully and ensure a strong bond.
Step 7: Reassemble and Test
After the drying time, carefully clean the contacts on the circuit board. Use a lint-free microfiber cloth and isopropyl alcohol for the best results. Reassemble your key fob remote. Go to your car and test the buttons.
If your key fob still isn’t working correctly, disassemble it again and carefully inspect the button contact area and the circuit board for any silicone residue or misalignment.
Conclusion
By following these steps, you can often successfully repair your broken key fob and restore its functionality. This DIY method is a cost-effective alternative to purchasing a new key fob and avoids the hassle of reprogramming. However, if you encounter difficulties or prefer a guaranteed solution, remember that keyfobx.com offers professional key fob repair and replacement services.
We hope this guide helps you fix your broken key fob and gets you back on the road with ease!