Is your Honda key fob displaying a low battery warning on your dashboard? Don’t worry, replacing the battery in your Honda key fob is a straightforward task you can easily do yourself. This guide will walk you through each step, ensuring a smooth and successful battery replacement, saving you time and potentially money compared to dealership service.
You might have noticed a message on your Honda’s dashboard indicating a low key fob battery. While it might still work for a short period, it’s best to replace it promptly to avoid being stranded. Using your spare fob temporarily is a good idea until you get a chance to swap out the battery.
Honda owner’s manuals provide basic instructions, but sometimes a little extra guidance and visual aids can make the process even clearer and more comfortable, especially if you’re concerned about handling the delicate electronics inside your key fob. Many online videos offer general advice, but this guide provides Honda-specific instructions and tips to make your battery replacement hassle-free.
Changing your key fob battery yourself is not only convenient but also a smart way to maintain your vehicle. Let’s get started!
What You’ll Need
Before you begin, gather these simple tools:
- New CR2032 Battery: You’ll need one CR2032 battery for each key fob. CR2032 batteries are widely available and have a long shelf life, so consider buying a multipack to have spares for the future or for your second key fob.
- Small Flathead Screwdriver: This will be used to gently pry out the old battery. A very small screwdriver from an eyeglass repair kit works perfectly.
Step-by-Step Guide to Changing Your Honda Key Fob Battery
Follow these easy steps to replace your Honda key fob battery:
Step 1: Remove the Emergency Key
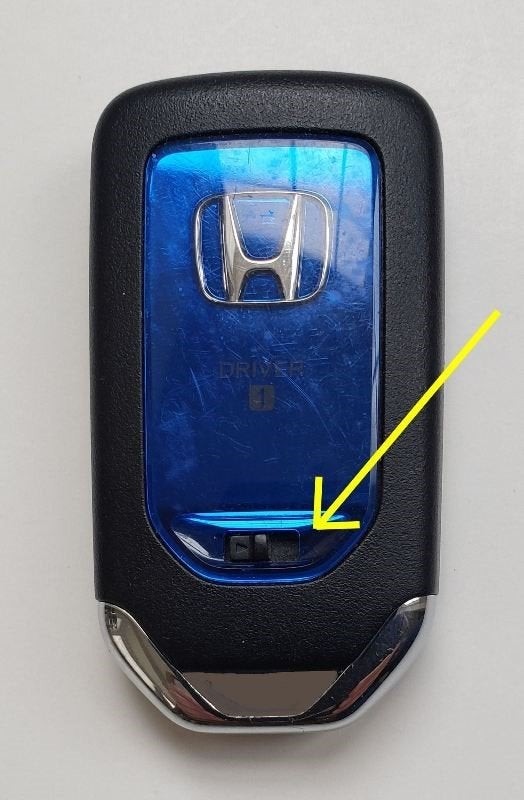
Locate the small release switch on your key fob. It’s usually a small button or slider on the side or bottom of the fob. Slide or press this switch to release the mechanical emergency key. Pull the key out and set it aside.
Did you know? The emergency key isn’t just for emergencies when your car battery is dead. It can also be used to manually unlock the trunk, which is helpful if your 12V car battery is flat and your jump starter is unfortunately in the trunk! The trunk lock cylinder is usually located behind the driver-side rear passenger headrest.
Step 2: Open the Key Fob Casing
The Honda owner’s manual suggests using a coin to split the key fob casing. While you can use a coin, your Honda emergency key is actually perfectly designed for this task!
Locate the small tabs on the key fob casing where the emergency key was removed. Insert the tip of your emergency key (or a coin) into the slot between these tabs. Gently twist the key or coin to pry the two halves of the key fob casing apart. You might hear a click as the casing separates.
Using the emergency key minimizes the risk of scratching your key fob, unlike a coin. Apply gentle but firm pressure; the casing should split without excessive force.
Step 3: Access and Remove the Old Battery
With the key fob casing open, you’ll see the CR2032 battery. The battery is held in place by small tabs.
Be careful at this stage! The circuit board inside is not firmly fixed, and you could accidentally dislodge the buttons if you’re not careful. To prevent this, lay the key fob flat on a table. Use your small flathead screwdriver to gently pry the old CR2032 battery out. Insert the screwdriver under the edge of the battery, as shown in the image below, and gently lift upwards.
The tabs indicated by the yellow arrows in the image overlap the battery. The green arrow shows the ideal spot to insert your screwdriver for easy removal. Take your time and avoid forcing anything.
Step 4: Install the New Battery
Take your new CR2032 battery and install it in the key fob. Slide one edge of the new battery under the two tabs (yellow arrows in the previous image) first. Then, press down on the other side of the battery until it snaps into place under the remaining tabs. You should feel a click when it’s securely seated.
Step 5: Reassemble the Key Fob
Carefully align the two halves of the key fob casing. Press them firmly together until they snap back into place. Ensure there are no gaps and the casing is securely closed.
It might require a bit more pressure than expected to close the casing completely. To make it easier, try squeezing the end opposite to the emergency key slot first, and then squeeze the end where the key goes. This technique often helps the two halves snap together more smoothly.
Tips for a Smooth Battery Replacement
- Work on a Flat Surface: As mentioned earlier, keeping the key fob flat on a table while removing and installing the battery helps prevent accidental dislodging of internal components.
- Proper Alignment: When reassembling the fob, ensure the two halves are perfectly aligned before pressing them together to avoid damaging the locking tabs.
- Battery Multipacks: Since CR2032 batteries are commonly used and have a long shelf life, buying a multipack is a cost-effective way to ensure you have spare batteries for future replacements or your second key fob.
Conclusion
Congratulations! You’ve successfully changed the battery in your Honda key fob. This simple DIY task can save you time and money. By following these steps, you can confidently replace your key fob battery whenever needed and keep your Honda running smoothly.
To protect your key fob from scratches and wear and tear, consider investing in a silicone cover. They are inexpensive and can help keep your key fob looking new for longer. You can find various options online by searching for “silicone key fob cover Honda.”