Is your car key fob starting to feel unresponsive? You might find yourself pressing the buttons multiple times just to lock or unlock your doors. Before you consider replacing the entire unit, which can be costly and require reprogramming, there are a few simple steps you can take to breathe new life into your existing key fob. Often, the culprit is nothing more than dirt and grime buildup, or in more persistent cases, worn-out button contacts.
This guide will walk you through how to clean your key fob effectively and, if necessary, how to perform a DIY repair to address those frustrating button issues. While cleaning is often the first and easiest solution, sometimes a bit more intervention is needed. This repair, based on a proven method, can save you from the expense of a new remote and the hassle of programming. Remember, attempting this repair is at your own risk, but if done carefully, it can be a successful fix.
(Before you start, ensure that the battery connections are solid. A common issue is cold solder joints at the battery mount. If you suspect this, refer to this guide for battery solder repair: https://www.chevyhhr.net/forums/how-tutorial-library-21/keyfob-cold-solder-repair-22641/)
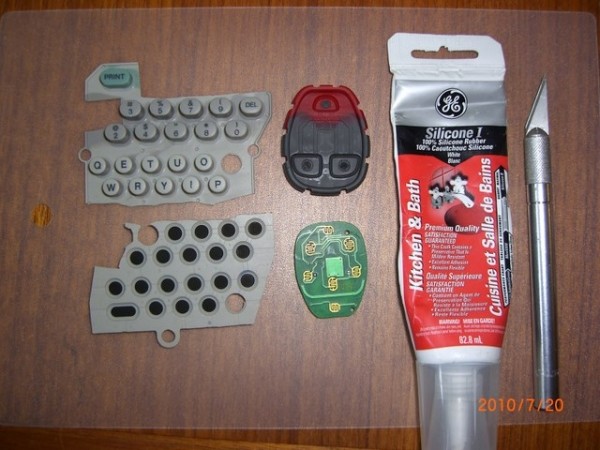
Materials Needed for Key Fob Repair
To undertake this key fob button repair, gather these materials:
- Your malfunctioning key fob
- A very sharp razor blade or Exacto knife for precise cutting
- 100% Silicone sealant (GE Silicone 1 or similar, avoid fast-drying glues)
- A toothpick for applying small amounts of silicone
- A donor silicone keypad from an old remote (TV remote, electronic device remote, etc.)
- Small Phillips head screwdriver (usually size #0 or #00 – check your key fob screws)
- Isopropyl alcohol for cleaning contacts (optional but recommended)
- Lint-free microfiber cloth or cotton swabs (optional for cleaning)
Step-by-Step Guide to Repairing Key Fob Buttons
Let’s get started with the repair process. Follow these steps carefully to fix your key fob buttons.
Step 1: Disassemble Your Key Fob
Carefully take apart your key fob remote using a small Phillips head screwdriver. Typically, there are small screws on the back of the fob. Once screws are removed, gently pry the two halves of the casing apart. Lay out all the components – casing halves, circuit board, and button keypad – on a clean surface.
Step 2: Prepare Replacement Button Material
From your salvaged silicone keypad, select a button that is similar in size and thickness to the ones on your key fob. Cut out this button using your razor blade or Exacto knife.
Step 3: Trim the “Carbon” Button from the Replacement
Carefully trim the “carbon” contact from the back of the silicone button you just cut. Aim to cut it thinly, leaving a very thin layer of the silicone backing attached to the “carbon” contact. This silicone backing will help with adhesion.
This image provides a closer view to help you gauge the desired thickness when trimming:
Step 4: Remove Worn Key Fob Buttons and Prepare Indentations
Now, turn your attention to the key fob itself. Using your razor blade, carefully remove the worn “carbon” buttons from the key fob keypad. You might find it easier to push the button from the back side to make it protrude slightly for a cleaner cut.
Once the original button is removed, slightly deepen the indentation where the button was located. This is because the new replacement button, with its silicone backing, might be a bit thicker than the original. Trim your new replacement buttons to ensure they fit snugly into these prepared indentations.
Step 5: Attach the New Replacement Buttons
Using a toothpick, apply a very small drop of 100% Silicone sealant into the button indentation on the key fob keypad. Carefully place one of your trimmed replacement buttons into the silicone, ensuring the carbon contact side is facing down (towards the circuit board). Press the button down squarely and immediately clean off any excess silicone that squeezes out around the edges. Crucially, avoid getting any silicone on the conductive “carbon” surface of the button. If you do, it’s best to discard that button, make a fresh one, and reapply.
Allow the silicone to set for a couple of minutes before applying the second button, being careful not to disturb the first one.
Step 6: Allow to Dry and Cure
Let the silicone dry and cure completely. It’s recommended to allow at least 2 hours, but ideally, leave it overnight for the best results before reassembling.
Step 7: Clean Circuit Board Contacts and Reassemble
While waiting for the silicone to cure, take the opportunity to clean the electrical contacts on the circuit board where the key fob buttons make contact. Use isopropyl alcohol and a lint-free cloth or cotton swab to gently clean these contact points. This step is crucial as it ensures good electrical conductivity for your newly repaired buttons.
Once the silicone is fully cured, carefully reassemble your key fob remote.
Step 8: Test Your Repaired Key Fob
Go to your car and test the buttons on your key fob. They should now be responsive with a normal press.
Troubleshooting
If your key fob still isn’t working correctly after the repair:
- Inspect for Silicone Fouling: Disassemble the key fob again and carefully inspect the underside of the keypad and the circuit board contacts. Ensure no silicone sealant has accidentally gotten onto the conductive “carbon” surface of the buttons or is obstructing contact with the circuit board.
- Check Circuit Board Damage: Examine the circuit board for any signs of damage, corrosion, or broken traces. If there’s significant circuit board damage, repair might not be feasible.
- Consider Keypad Swap: If you suspect the issue might still lie with the keypad (though less likely after this repair), you can consider purchasing a new, inexpensive key fob of the same type and swapping the silicone keypads. This avoids the need for reprogramming in some cases, but compatibility isn’t guaranteed.
- Professional Help: If all else fails, it might be time to consult a professional locksmith or car dealership for key fob replacement and programming.
Conclusion
Repairing your key fob buttons can be a cost-effective solution to restore functionality when cleaning alone isn’t enough. By carefully following these steps, you can often fix unresponsive buttons and extend the life of your existing key fob. Remember to take your time, be precise with the delicate components, and enjoy the satisfaction of a successful DIY repair.