Key fobs are essential for modern car convenience, but daily use can lead to dirt accumulation and wear, causing按钮 to become unresponsive. Before considering costly replacements, cleaning your key fob is a simple first step that can often restore functionality. This guide will walk you through how to clean your key fob effectively and even address a common issue of worn-out button contacts.
Understanding Key Fob Maintenance
Just like any frequently used device, your car key fob is susceptible to collecting grime, oils from your hands, and pocket lint. This buildup can interfere with the electrical contacts inside the fob, leading to buttons that require multiple presses or fail to work altogether. Regular cleaning can prevent these issues and extend the life of your key fob.
While basic cleaning can resolve many problems, sometimes the issue lies deeper with worn-out “carbon” buttons on the internal keypad. If simple cleaning doesn’t work, this guide also provides a DIY repair to rejuvenate those worn contacts, potentially saving you from buying a new key fob and the hassle of reprogramming.
Before you begin: Ensure you have a clean workspace and take your time. If you’re uncomfortable with DIY electronics repair, consult a professional. Disclaimer: Attempt this repair at your own risk. We are not responsible for any damage you may cause to your key fob.
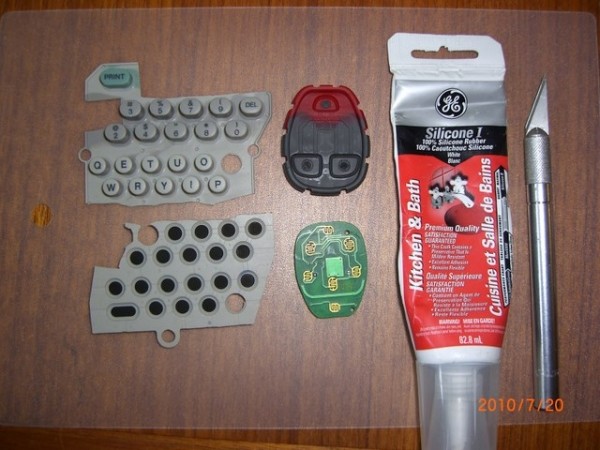
Materials You’ll Need for Cleaning and Repair
For basic cleaning:
- Soft, lint-free cloth (microfiber is ideal)
- Isopropyl alcohol (rubbing alcohol)
- Cotton swabs (optional, for tight spots)
For button repair (if basic cleaning is insufficient):
- Your key fob
- Very sharp razor blade or Exacto knife
- 100% Silicone sealant (GE Silicone 1 or similar recommended)
- Toothpick
- Silicone keypad from a spare remote (TV remote, old electronic device, etc.)
- Small Phillips head screwdriver (usually size #0 or #00 – check your fob screws)
Step-by-Step Guide to Cleaning Your Key Fob
Step 1: Disassemble Your Key Fob
Carefully open your key fob casing. Most fobs are held together by small Phillips head screws, while some might snap together. Locate the screws (usually on the back) and use the appropriate screwdriver to remove them. If there are no screws, gently pry apart the casing halves, starting at the key ring loop or a designated seam. Be careful not to force it and damage the plastic.
Step 2: Basic Cleaning of the Key Fob Components
Once open, you’ll see the circuit board and the rubber button pad.
- Plastic Casing: Wipe down the plastic casing halves with a soft cloth slightly dampened with isopropyl alcohol. This will remove dirt, grime, and fingerprints. Ensure the plastic is completely dry before reassembling.
- Rubber Button Pad: Gently clean the rubber button pad with a dry cloth or a slightly damp cloth with isopropyl alcohol. Pay attention to the button contact areas (the black conductive circles on the underside). Remove any visible debris.
- Circuit Board Contacts: Using a cotton swab lightly dampened with isopropyl alcohol, carefully clean the gold contact points on the circuit board where the rubber button pad makes contact. Let the alcohol evaporate completely before proceeding.
Step 3: Reassemble and Test
After cleaning, carefully reassemble the key fob in reverse order. Ensure the rubber button pad is correctly aligned with the circuit board. Tighten the screws if applicable, but don’t overtighten. Test the buttons to see if responsiveness has improved.
Repairing Worn-Out Key Fob Buttons (Advanced Cleaning/Repair)
If basic cleaning doesn’t solve the issue and your buttons are still unresponsive or require excessive pressure, the conductive “carbon” pads on the rubber buttons might be worn out. This requires a more involved repair.
Step 4: Prepare Replacement Button Material
Take your spare silicone keypad and select a button area that is similar in size or slightly larger than the worn buttons on your key fob. Using a sharp razor blade or Exacto knife, carefully cut out a single rubber button.
Step 5: Thin Down the Replacement Button
Trim the back of the salvaged rubber button to make it thinner. You want to remove some of the bulk while retaining a thin layer of the gray/white silicone backing that contains the conductive “carbon” material. Be cautious not to cut too thin.
Step 6: Remove the Worn “Carbon” Buttons from the Key Fob
Carefully remove the original worn “carbon” buttons from your key fob’s rubber pad. From the back side of the rubber pad, gently push on the button to make it protrude slightly on the front. Use your razor blade to carefully slice off the old “carbon” button.
After removing the old button, slightly deepen the indentation where the button was. This will accommodate the new, potentially thicker, replacement button.
Step 7: Attach the New Replacement Buttons
Using a toothpick, apply a very small drop of 100% silicone sealant into the button indentation on the rubber pad. Place a replacement button into the indentation and press it down firmly and squarely. Immediately wipe away any excess silicone that squeezes out. Crucially, avoid getting silicone on the conductive surface of the new button. If you do, remove it, clean the area, and use a fresh replacement button.
Repeat this process for any other worn buttons. Allow the silicone to cure for at least a couple of hours, preferably overnight, to ensure a strong bond.
Step 8: Final Cleaning, Reassembly, and Testing
Once the silicone is fully cured, clean the circuit board contacts again with isopropyl alcohol to ensure no silicone residue is present. Reassemble your key fob carefully. Test all buttons to confirm they are now responsive.
If a button still doesn’t work, re-disassemble and inspect the button contact area and the circuit board for any silicone contamination or misalignment.
Conclusion: Extend Your Key Fob’s Life
Regular cleaning is a simple yet effective way to maintain your key fob’s functionality. For more stubborn button issues, this DIY repair offers a cost-effective solution to revive worn-out contacts. By following these steps, you can often avoid the expense and inconvenience of replacing your key fob, keeping your car accessible and your wallet happy.