Is your car key fob giving you trouble? Do you have to press the buttons multiple times for your car to respond? Worn-out buttons are a common issue with key fobs, often leaving drivers frustrated. Instead of immediately thinking about expensive replacements or programming, you might be able to fix it yourself. This guide will show you how to repair your key fob buttons using a simple DIY method, potentially saving you time and money. If cleaning the internal contacts of your key fob hasn’t solved the problem, this repair technique, focusing on replacing the worn carbon pads, could be the solution you need.
Before we begin, remember that this is a do-it-yourself repair. While this method has proven effective for many, including myself, proceed at your own risk. If you’re uncomfortable with DIY electronics repair, seeking professional help might be a better option. Ensure that the issue isn’t due to battery problems or cold solder joints, which are addressed in separate guides (like the one found on Chevy HHR forums for cold solder joint repair).
Let’s get started on how to breathe new life into your key fob buttons.
Materials Needed
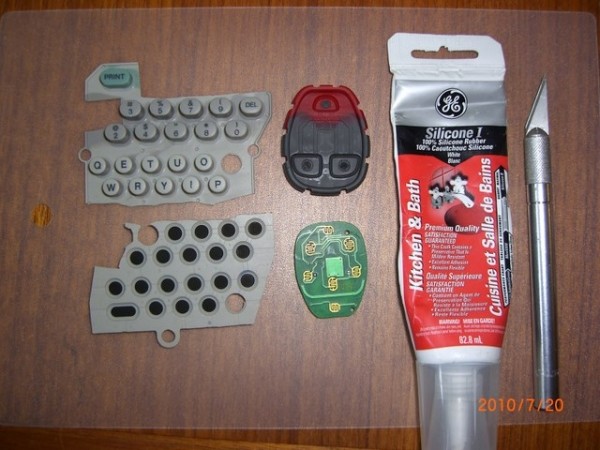
To perform this key fob button repair, you’ll need a few readily available materials:
- Your faulty key fob: This is the patient we’re going to operate on.
- Sharp Razor or Exacto Knife: Precision is key for cutting and trimming.
- 100% Silicone Sealant: Regular silicone sealant works best. Avoid alternatives like super glues or epoxy as they may not adhere well to the silicone keypad. GE Silicone 1 or similar brands are suitable.
- Toothpick: For precise application of the silicone.
- Silicone Keypad from a Doner Device: An old TV remote, electronic labeller, or any unused silicone keypad can be a source for replacement buttons.
Step-by-Step Guide to Repairing Your Key Fob
Follow these steps carefully to repair your key fob buttons:
Step 1: Disassemble the Key Fob
Carefully open your key fob casing. Most key fobs are held together by small screws or clips. Gently separate the two halves to access the internal components. Lay out all the parts, including the circuit board and the silicone keypad, on a clean surface.
Step 2: Prepare the Replacement Button
From your salvaged silicone keypad, select a button that is similar in size or slightly larger than the worn-out buttons on your key fob. Using your razor or Exacto knife, carefully cut out the button from the donor keypad.
Step 3: Trim the Replacement Button
The replacement button likely has a carbon contact pad on the back. Trim this carbon pad to be thin but not too thin. You need a very thin layer of the gray/white silicone backing to support the “carbon” contact part.
The goal is to have a thin, flexible replacement button with a functional carbon contact.
Step 4: Remove Old Buttons and Prepare the Fob
This step requires delicacy. Turn the silicone keypad of your key fob over and gently push from the front side of the buttons to make the worn carbon pads protrude slightly from the back. Using your razor knife, carefully slice off the old, worn “carbon” buttons.
Once the old buttons are removed, slightly deepen the indentations where the buttons were located. This is to accommodate the new, potentially thicker, replacement buttons. Trim the indentations carefully to ensure a good fit for the new buttons.
Step 5: Attach the New Buttons
Using the toothpick, apply a very small drop of silicone sealant into one of the button indentations on the key fob keypad. Place one of your trimmed replacement buttons into the indentation, pressing it down squarely. Immediately wipe away any excess silicone that squeezes out. Crucially, avoid getting silicone on the contact surface of the new carbon button. If this happens, make a fresh button and start again.
Let the silicone set for a couple of minutes before repeating the process for the remaining button(s), being careful not to disturb the first one.
Step 6: Drying Time
Allow the silicone to dry completely. It’s best to let it cure for at least two hours, or preferably overnight, to ensure a strong bond.
Step 7: Reassemble and Test
After the silicone is fully dried, clean the contacts on the circuit board using isopropyl alcohol and a lint-free cloth. Reassemble your key fob remote carefully. Go to your car and test the buttons. They should now be responsive with a single press.
Troubleshooting
If your key fob still isn’t working after the repair, disassemble it again and inspect the following:
- Silicone Fouling: Check for any silicone sealant that might have accidentally gotten onto the contact surface of the new carbon buttons or the circuit board contacts. If found, carefully remove it.
- Button Alignment: Ensure the new buttons are properly aligned with the contacts on the circuit board when the key fob is reassembled.
If all else fails, and you suspect you may have significantly damaged your original keypad, remember that you can purchase a new, unprogrammed key fob and swap the silicone keypad from your old one to the new one. This can save you the cost of programming a completely new remote.
Conclusion
Repairing your key fob buttons at home is a straightforward process that can save you from the expense of buying a new key fob or professional repair services. By following these steps on how to repair your key fob, you can likely restore the functionality of your car remote and eliminate the frustration of unresponsive buttons. With patience and careful execution, you can successfully complete this DIY repair and get your key fob working like new again.