Good morning! Are you looking for a fun and personalized way to accessorize your keys or create a thoughtful gift? Today, we’re diving into the world of DIY crafts with a fantastic project that lets you showcase your favorite photos in a unique way. We’re going to learn how to make a Key Fob Picture charm using a Cricut machine. This is question 6 in our Cricut series, exploring the diverse materials you can cut with this amazing tool.
The beauty of a Cricut machine lies in its versatility. You might be surprised at the sheer number of materials it can handle. From delicate paper to thicker fabrics, your creative possibilities are virtually limitless. Here’s just a glimpse of what your Cricut can cut:
- 3M Post It Notes
- Adhesive Magnetic Sheets
- Aluminum Foil
- Aluminum Metal
- Canvas
- Cardstock
- Chipboard
- Construction Paper
- Cork Board, Adhesive Backed
- Craft Foam
- Cutting Mat Protector
- Duck Tape
- Fabric
- Felt
- Foam
- Foil, Adhesive Backed
- Iron-On Material
- Leather
- Magnet Sheets
- Paint Chips
- Paper
- Watercolor Paper
- Photo Paper
- Poster Board
- Premium Outdoor Vinyl
- Printable Tattoo Paper
- Stencil Vinyl
- Sticker Paper
- Transparency
- Vellum
- Vinyl
- Washi Sheets
- Washi Tape
- Wax Paper
- Window Cling
- Wood (thin)
- Wrapping Paper
For our key fob picture project, we’ll be using faux leather and transparency paper. Don’t worry if you’re new to Cricut; cutting these materials is surprisingly smooth and easy. Let’s gather our supplies and get crafting!
Supplies You’ll Need:
- Pebbled Faux Leather, Patina Sampler
- Cricut Explore Air™ machine
- Transparency paper
- Cricut Standard Grip Cutting Mat, 12×12
- Key rings (1 small, 1 large per key fob)
- Eyelet setter (like Crop-a-dile)
- Hot glue gun
- Key fob cut file from Cricut Design Space
- Your favorite photos
Let’s start with the fun part – the faux leather! Cricut’s faux leather is perfect for this project, offering durability and a stylish look for your key fob picture frame.
Step-by-Step Guide to Creating Your Key Fob Picture:
- Find Your Cut File: Cricut Design Space is a treasure trove of ready-to-use designs. Search for “DIY photo key fob cut file” or simply “key fob” to find a template you love. We found a great one that’s perfect for showcasing a key fob picture.
- Prepare Your Cricut Machine: Since faux leather isn’t on the standard Cricut dial, turn the dial to “Custom.” This will open up a menu of material options on your computer.
- Select Faux Leather Setting: In the custom materials menu, find and select “Faux Leather.” This setting ensures your Cricut cuts through the material cleanly and precisely, giving you perfect shapes for your key fob picture.
- Cut the Faux Leather: Place your faux leather on a green Standard Grip mat and load it into your Cricut. Send the design to your machine, and watch it cut out the key fob shapes effortlessly.
- Cut Transparency Paper: Now, switch to transparency paper. Remember to adjust your cut settings for this thinner material. Cut out the transparency pieces that will protect your key fob picture.
- Prepare Your Photos: Use the transparency pieces as templates to trace and cut out your chosen photos. Scissors work perfectly for this step. You’ll want your photos to fit snugly inside the faux leather frames.
- Assemble the Key Fobs: Heat up your hot glue gun. Carefully glue the transparency piece over your photo, and then glue this combination inside the faux leather key fob frame. Make sure everything is aligned and secure.
- Add an Eyelet: Use a Crop-a-dile or similar tool to insert an eyelet at the top of your key fob picture. This will reinforce the hole for the keyring and give it a professional finish.
- Attach Key Rings: Finally, add the key rings. We used a combination of a smaller and larger ring for each key fob picture for a bit of extra style.
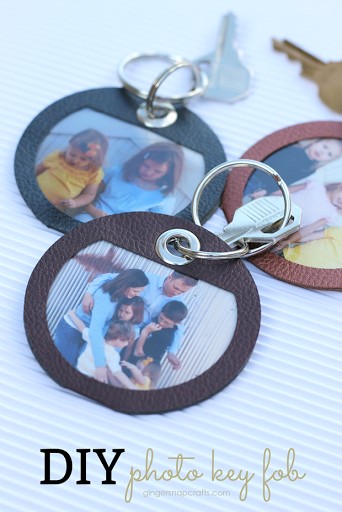
And there you have it – your very own key fob picture! These make wonderful personalized gifts, especially for grandparents or anyone who cherishes photo memories.
If you enjoyed this DIY project, you might also like these other photo gift ideas:
Photo Pendant Tutorial
Photo Block Puzzle Tutorial
Washi Tape Photo Plaque Tutorial
DIY Photo Memory Board Tutorial
DIY Canvas Print Tutorial
Let us know in the comments below what kind of photo gifts you enjoy giving or making. And which ones would you try with your Cricut? We’d love to hear your creative ideas!
Thank you for visiting our blog today! If you’re new here, we invite you to stay connected through our social media channels!
Facebook Twitter Pinterest Instagram Google+ Bloglovin
This tutorial was created by Ginger Bowie from Ginger Snap Crafts as part of a sponsored series with Cricut. All opinions and text are her own.