Keychains are essential accessories, and a personalized, handmade needlepoint key fob makes a thoughtful and unique gift for any occasion. If you’re looking for a fulfilling DIY project or a charming present for a teacher, friend, or loved one, needlepoint key fob kits are an excellent choice. They’re perfect for stitching on the go and offer a quick, satisfying creative outlet.
At keyfobx.com, we understand that finishing your needlepoint projects can sometimes feel overwhelming. That’s why we’ve created this comprehensive guide to simplify the process of Needlepoint Key Fob Finishing. With our easy-to-follow, step-by-step tutorial, you’ll become a pro at finishing your keychains in no time. The key to a professional finish lies in mastering the “Binding Stitch,” a technique that adds durability and a polished edge to your needlepoint creations.
The binding stitch is an invaluable skill for any needlepointer. It not only provides a clean, finished edge but also reinforces the edges of items like keychains, belts, purse straps, and headbands, protecting them from wear and tear. This stitch is always applied as the final step, after your needlepoint design is complete. For a detailed breakdown of the binding stitch, be sure to check out our tutorial here. Trust us, if we can master it, so can you! It’s a rhythmic and almost meditative process once you get the hang of it.
Follow our detailed instructions below to achieve a flawless finish for your needlepoint keychains.
Materials You’ll Need for Needlepoint Key Fob Finishing:
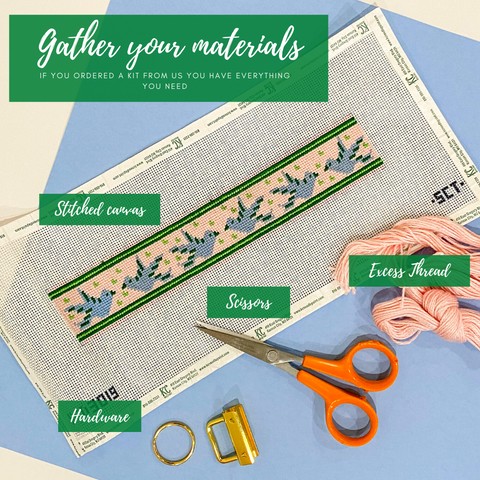
Before you begin, gather these essential materials:
- Keychain Canvas – Stitched: Your completed needlepoint design on canvas.
- Excess Thread: Leftover thread from your project, used for the binding stitch to ensure color consistency.
- Keychain Hardware: The metal components that will turn your needlepoint into a functional key fob.
- Sharp Sewing Scissors: For precise trimming of your canvas.
Step 1: Gather Your Materials
Ensure you have all the necessary materials listed above within reach. If you’ve purchased a key fob kit from KC Needlepoint, rest assured that all the required supplies are included, simplifying your needlepoint key fob finishing process.
Step 2: Stitch Your Needlepoint Project
When stitching your keychain canvas, it’s crucial to leave the outermost two canvas threads along each long edge unstitched. Stitch your chosen design within these boundaries, leaving these four rows (two on each side) bare. These unstitched rows will be used to create the binding stitch, ensuring your finished keychain fits perfectly into the hardware provided in your kit. This step is vital for successful needlepoint key fob finishing.
Step 3: Trim the Excess Canvas
With the outer two rows unstitched, carefully trim away most of the excess canvas. Leaving a small border makes folding easier and neater. On the side you intend to finish first, cut close to the first unstitched row. This precise trimming is important for a clean needlepoint key fob finishing.
Step 4: Fold the Canvas
Fold your canvas in half lengthwise, aligning the edges as precisely as possible. If your design features distinct elements on each side, like the birds in our example, use them to ensure accurate folding. Count the threads between design elements to check for evenness. Don’t worry if your fold is off by a thread or two; slight discrepancies will be hidden once the hardware is attached during the needlepoint key fob finishing process.
Step 5: Add the Binding Stitch
Now, it’s time to employ the binding stitch. This stitch will securely join both sides of your folded canvas, creating a neat, durable strip. Begin on the side where you made the closer trim in Step 3, working from the folded edge towards the open end. Repeat the binding stitch along the opposite side, again trimming excess rows beforehand. The binding stitch is the core technique in needlepoint key fob finishing, providing both structure and a refined look.
Step 6: Attach the Keychain Hardware
Once you’ve completed the binding stitch on both sides, your keychain is ready for the hardware. Attaching the hardware is quite intuitive. Simply slide the open end of your stitched and bound needlepoint into the hardware piece. Squeeze the hardware firmly to secure it in place. You should be able to do this by hand, but if needed, pliers can be used to ensure a tight closure around the fabric. This hardware application finalizes the needlepoint key fob finishing process.
Step 7: Add Your Keys and Enjoy!
Congratulations! Your DIY needlepoint key fob is now complete. Add it to your car keys, backpack, or use it to keep track of spare keys. These personalized keychains also make wonderful, heartfelt gifts for friends and family.
Click here to explore our wide selection of keychain kits and start your next needlepoint key fob finishing project today!
Order now to secure your favorite designs and colors – our keychain kits are popular and selling fast!