Is your car key fob giving you trouble? Do you have to press the buttons multiple times for it to lock or unlock your doors? Worn-out buttons are a common issue with key fobs, but before you rush to replace the entire unit, consider a simple and effective DIY repair. This guide will walk you through how to Repair Key Fob buttons yourself, saving you time and money.
Over time, the conductive pads under the buttons of your key fob can wear out. This is similar to how remote controls for TVs and other devices can become less responsive with age. Instead of consistently making contact with the circuit board, these worn pads require increasingly harder or multiple presses to function. If cleaning the circuit board contacts and the button pads no longer solves the problem, this DIY repair key fob method is your next best step.
This repair is a practical solution for restoring the responsiveness of your key fob buttons. It’s a straightforward process that anyone with basic DIY skills can accomplish. Follow these steps to bring your key fob back to life. Remember, while this guide is designed to be helpful, any repairs you undertake are at your own risk.
Before starting, ensure that the issue isn’t a dead battery or a problem with the battery solder joints. If you suspect battery issues, check out our guide on key fob battery cold solder repair first.
Materials You’ll Need for Key Fob Repair
To successfully repair key fob buttons, gather these readily available materials:
- Your faulty key fob
- A sharp razor blade or precision knife (like an Exacto knife)
- 100% Silicone sealant (GE Silicone 1 or similar). Avoid other adhesives like crazy glue or gorilla glue as they may not adhere well to the silicone keypad.
- A toothpick for precise silicone application
- A donor silicone keypad from an old remote (TV remote, electronic device remote, etc.)
Step-by-Step Guide to Repairing Your Key Fob
Let’s get started with the repair key fob process. Follow each step carefully to ensure a successful outcome.
Step 1: Disassemble Your Key Fob
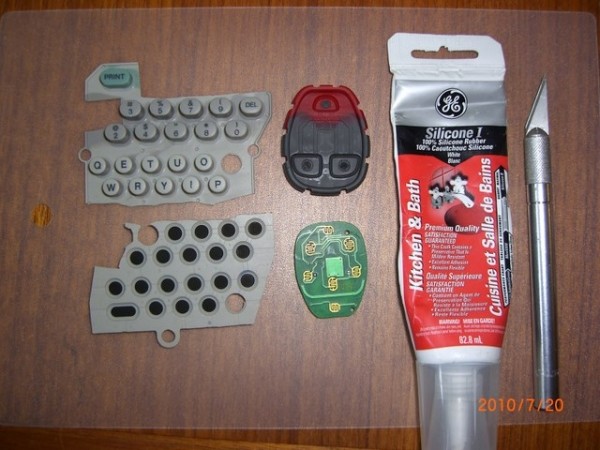
Carefully take apart your key fob remote. Most key fobs are held together by small screws or clips. Once disassembled, lay out all the components along with your tools and materials, as shown in the image below.
Step 2: Prepare the Replacement Button
From your salvaged silicone keypad, select a button that is similar in size to the ones on your key fob. Using your razor knife, carefully cut out this button.
Step 3: Trim the Old Button Area
Now, you need to prepare the replacement button. Trim the “carbon” contact from the back of the button you just cut out. Aim to cut it thinly, leaving a very thin layer of the gray/white silicone backing to support the carbon contact. This step is crucial for ensuring the button is responsive without being too thick.
Refer to this image for a better idea of the desired thickness. The goal is a thin profile for optimal contact.
Next, carefully remove the original worn “carbon” buttons from your key fob remote. Push from the backside of the rubber keypad to make the button protrude, allowing for a clean cut with your razor knife. After removing the old buttons, slightly deepen the indentations where the buttons were located. This will accommodate the slightly thicker replacement buttons. Trim your new replacement buttons to fit snugly into these indentations.
Step 4: Attach the New Button
Using the toothpick, apply a tiny drop of silicone sealant into one of the button indentations. Carefully place a replacement button into the silicone, pressing it down squarely. Immediately wipe away any excess silicone that squeezes out. Crucially, avoid getting any silicone on the conductive “carbon” surface of the new button. If this happens, remove it, create a fresh button, and try again. Let the silicone set for a couple of minutes before moving on to the next button to prevent disturbing the first one.
Step 5: Drying and Reassembly
Allow the silicone to dry completely. Ideally, let it cure for at least two hours, or even better, overnight to ensure a strong bond.
Step 6: Test Your Repaired Key Fob
Once the silicone is fully dried, clean the contacts on the circuit board using alcohol and a lint-free cloth. Reassemble your key fob remote. Go to your car and test the buttons. They should now be responsive with a single, firm press!
If your repair key fob attempt is unsuccessful, disassemble the unit again and inspect for any silicone residue fouling the button contact or the circuit board.
In a worst-case scenario, if the repair doesn’t work out, remember that you can always purchase a new key fob and potentially swap the silicone keypads to avoid the hassle and cost of reprogramming a completely new remote.
This DIY repair key fob guide offers a cost-effective solution to a common problem. With patience and careful execution, you can restore your key fob to its original functionality and avoid the expense of replacement. Good luck!