Is your Switchblade Key Fob blade loose, failing to lock into position, or perhaps you’ve acquired a used key fob that’s been cut for a different vehicle? Don’t worry, replacing just the blade is a straightforward and cost-effective solution. In the past, finding replacement blades separately was challenging, but now, blank blades are readily available online, often at affordable prices. This guide will walk you through the simple process of replacing your switchblade key fob blade, saving you money and hassle.
Before you start, gather these tools:
- Precision Phillips screwdrivers (PH0 and PH1)
Let’s begin the blade replacement:
-
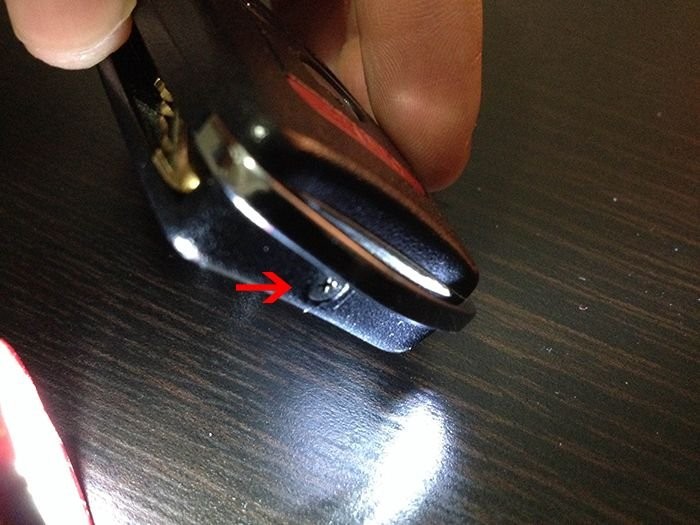
Remove the Initial Screw. Locate the single screw at the base of your switchblade key fob. Using your PH0 screwdriver, carefully remove this screw.
-
Separate the Remote Housing. Gently pry open and detach the remote portion of the switchblade key fob. You can do this by pushing upwards on the key ring area to separate the two halves of the fob.
-
Open the Blade Cover Carefully. The blade cover needs to be carefully pried open. Start from one side and gently work your way around. This cover is held in place by both adhesive residue and small clips, so take your time to avoid damage.
-
Remove the Securing Screws. You’ll find three small screws holding the blade mechanism in place. These screws may have threadlocker on them, so it’s crucial to use the correct screwdriver size to prevent stripping the screw heads. Use the PH1 screwdriver for the two black screws and the PH0 for the silver screw.
-
Detach the Metal Blade Piece. Once the screws are removed, the metal piece securing the blade should swing counterclockwise. Be aware that there’s a spring underneath this piece, so proceed with caution.
-
Remove the Metal Piece and Spring. Carefully remove the metal piece to expose the spring and blade. Try not to bend or distort the spring during removal, as it is essential for the switchblade key fob mechanism to function correctly.
-
Take Out the Spring. Remove the spring from its position. Note its orientation for reassembly later.
-
Extract the Old Blade. Now you can easily remove the old switchblade key fob blade.
At this stage, your switchblade key fob should be disassembled into these components:
-
Prepare the New Blade and Swap Immobilizer Chip. Examine your new blade. You’ll need to transfer the immobilizer chip from your old blade to the new one. This chip is usually located behind a small plastic door on the blade. The reason your old blade might be loose is often due to wear in the slot that holds the blade in the closed position.
-
Assemble and Get Your Key Cut. Place the new blade into the switchblade key fob mechanism and reassemble all components in reverse order. Once reassembled, you’ll need to get your new blade cut to match your vehicle’s ignition.
Cost-Effective Key Fob Repair
By replacing the blade yourself, you can significantly reduce the cost of repairing your switchblade key fob. Purchasing a used switchblade key fob online and a new blade can be a fraction of the price of a new key fob from a dealership.
Important Note: This DIY guide is primarily intended for 2007-2008 Acura TL models. While blank blades may be available for other models, ensure compatibility and locksmith availability for cutting. For older models (like 2004-2006 TL), milling might be required, potentially adding to the cost.
This simple repair can restore the functionality of your switchblade key fob and save you a considerable amount of money compared to dealership replacement costs. Enjoy your newly functional key!