Tired of the mundane, mass-produced plastic key fob that came with your car? Many car owners feel the same way, longing for a touch of personalization even in the smallest of accessories. This guide will walk you through the exciting process of creating a Customizable Key Fob that not only looks unique but also reflects your personal style. Inspired by the desire to upgrade a generic car key, this project demonstrates how to craft a durable and aesthetically pleasing key fob from hardwood and aluminum, using CNC machining. While maintaining all the original remote functionalities, this is primarily a cosmetic and tactile upgrade, turning a boring necessity into a piece of craftsmanship you can appreciate daily.
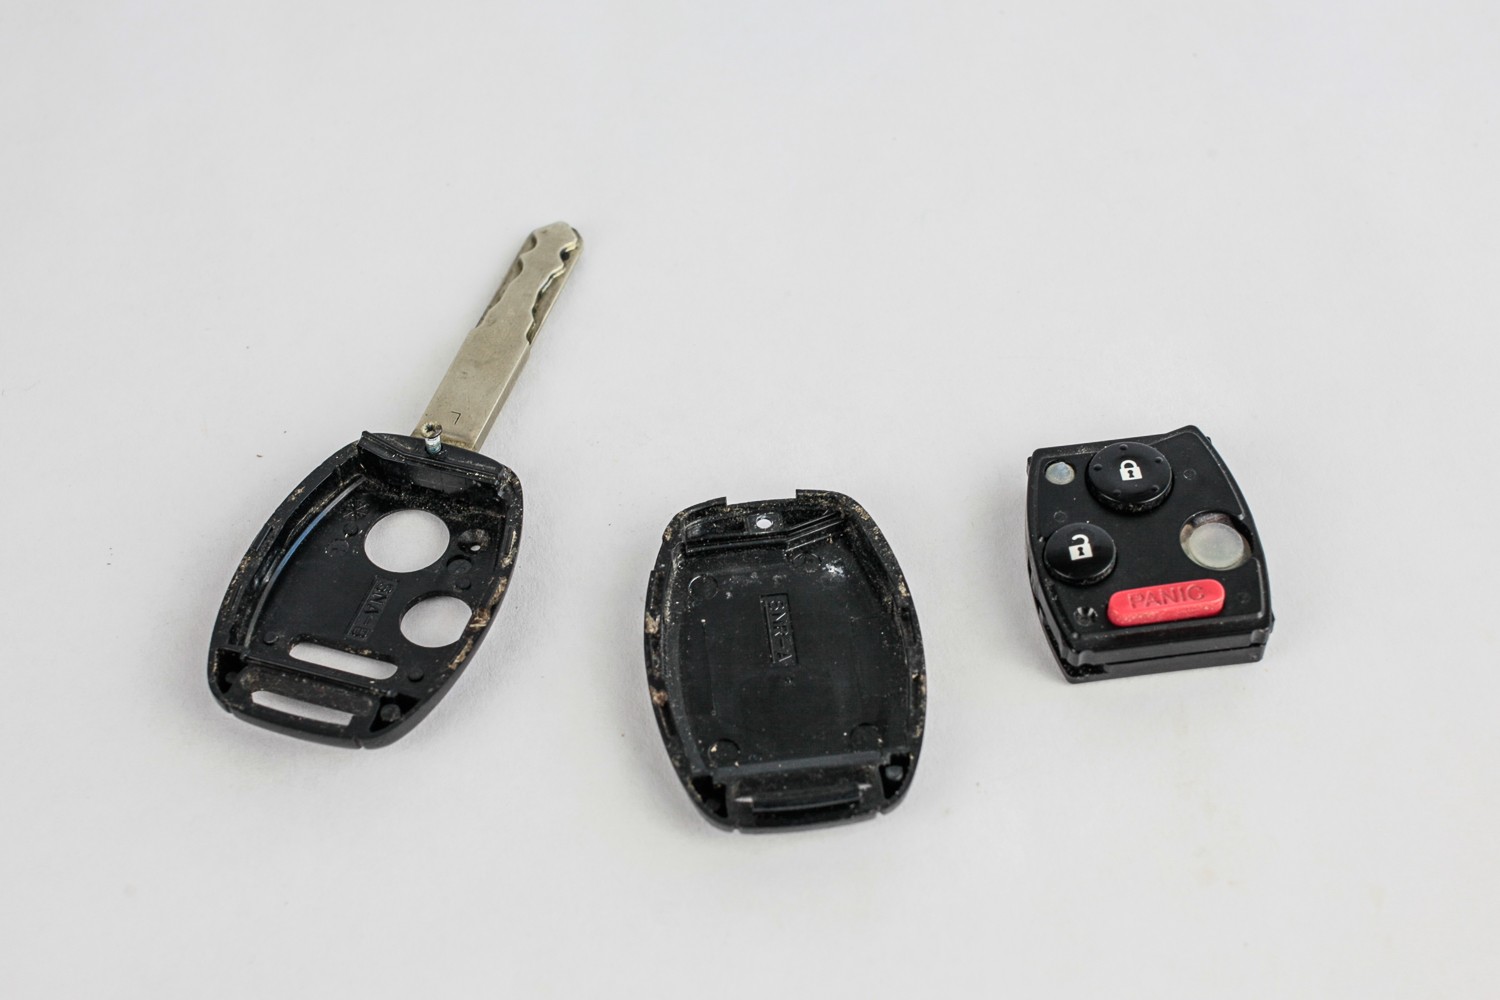
Let’s begin by disassembling the original key fob. In this case, we’re starting with a key from a 2010 CRV – a perfectly functional but unremarkable design. Typically, these fobs are held together by small screws and clips. Upon opening, you’ll find the remote portion neatly contained within its own unit, a testament to efficient design. Inside this unit, the circuit board and battery are housed. For our custom project, we’ll retain the essential bottom piece that secures the battery and circuit board, discarding the rest of the original plastic casing. The key itself is usually glued into the plastic shell, requiring careful separation. To simplify this project, we will preserve the original key largely unchanged, focusing on creating a new housing around the existing remote components.
With all components carefully examined and measured, the next step is designing the new customizable key fob. The original fob features a soft, oval shape, but for this custom version, a more angular and robust design was chosen. The design includes an aluminum frame and buttons, along with two hardwood shells. These parts are designed to be precisely cut and then assembled using machine screws that thread into the aluminum frame, securely holding the bottom shell and the key. Accuracy in measurement is paramount to ensure all buttons, lights, and the key align perfectly. This meticulous design phase, while time-consuming, is crucial for a successful outcome. Software like Adobe Illustrator for design and OpenBuilds CAM for generating CNC toolpaths are invaluable in this process.
The fabrication process begins with milling the aluminum parts. A 1/16″ upcut bit, used with a Lead CNC 1010 machine, was chosen for its precision in detailing the aluminum frame and buttons. Aluminum is an excellent material choice for a customizable key fob frame due to its durability and ability to withstand daily wear and tear. Milling aluminum, especially at a 1/4″ thickness, is a slow and deliberate process, taking around 4 hours to complete. The intricate holes around the frame are designed to enhance adhesion in later assembly stages. After machining, the parts are carefully released from the stock material, and any rough edges are smoothed using a file and sandpaper, revealing the clean, precise aluminum components.
Next, the wooden shells are crafted. For this project, a piece of Chechen wood scrap was selected for its beautiful grain and hardness. Using the same Lead CNC machine, the wood parts are milled. Compared to aluminum, machining wood is significantly faster, taking only about 20 minutes to cut out the two shell pieces. Following the CNC milling, a quick cleanup process ensures the wooden shells are smooth and ready for finishing. The combination of aluminum and hardwood creates a tactile and visually appealing contrast, elevating the feel of the customizable key fob.
Assembly and finishing involve several key steps. Screw holes are recessed from the back of the wooden shells using a drill press to ensure a flush fit. A chamfer is added to the outer faces of the shells, enhancing the aesthetic and ergonomic feel. The key hole is enlarged to allow the M3 screw to pass through, and the aluminum frame is tapped to receive the screw threads. Epoxy is used to secure the aluminum frame to the top face of the key, providing a robust bond. Finally, a personal touch is added by engraving a logo onto the back of the wooden shell using a 90° V-bit. The final assembly is straightforward: the buttons and circuit board are placed into the frame, and the two shells are closed and secured with screws. A touch of oil on the wood brings out its natural beauty and completes the transformation.
The result is a customizable key fob that is truly one-of-a-kind. Moving away from the generic, mass-produced feel of the original, this DIY project transforms a mundane car accessory into a personalized item of craftsmanship. This project demonstrates the potential for upgrading even the smallest details of our everyday lives, offering a unique blend of functionality and personal expression. It’s a testament to how DIY and CNC machining can empower individuals to create bespoke items that reflect their individuality and passion for detail.
If you’re inspired by this project and eager to explore more custom creations, consider following makers and communities online for further inspiration and techniques. Exploring the world of DIY car modifications and CNC projects can unlock a realm of personalization and unique expression.