Is your Chevy key fob driving you crazy? Do you have to press the buttons multiple times, sometimes up to 30 attempts, just to lock or unlock your car? If cleaning the inside of your key fob hasn’t solved the problem, the issue might be worn-out “carbon” buttons inside the remote. This guide offers a DIY fix that could save you from buying a new, and potentially costly, replacement key fob and the hassle of programming it.
Before you start, it’s important to ensure the problem isn’t related to battery solder joints. If you suspect that might be the case, check out this guide on how to repair broken solder joints at the battery mount: https://www.chevyhhr.net/forums/how-tutorial-library-21/keyfob-cold-solder-repair-22641/. Assuming your battery connections are solid, let’s move on to fixing those stubborn buttons inside of your key fob for your Chevy.
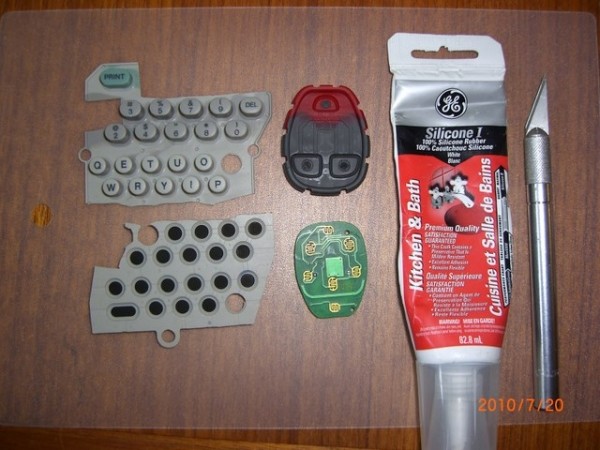
What You’ll Need:
- Your malfunctioning Chevy key fob
- A sharp razor blade or Exacto knife for precise cutting
- 100% Silicone sealant (GE Silicone 1 or similar). Avoid super glues or gorilla glues as they don’t adhere well to the silicone keypad inside the fob.
- A toothpick for applying the silicone in small amounts
- A donor silicone keypad – an old TV remote or electronic device keypad will work perfectly.
Step-by-Step Repair Guide
Step 1: Disassemble Your Chevy Key Fob
Carefully take apart your Chevy key fob. You’ll want to lay out all the components neatly along with your tools and materials. This will help keep you organized during the repair process.
Step 2: Prepare a Replacement Button
From your salvaged silicone keypad, select a button that is similar in size or slightly larger than the ones in your key fob. Use your razor blade or Exacto knife to carefully cut out this button.
Step 3: Thin Down the Replacement Button
Now, you need to trim the “carbon” contact part of the button you just cut. The goal is to make it thin, but not paper-thin. You want to retain a very thin layer of the silicone backing to support the conductive “carbon” material. This layer is crucial for ensuring good contact with the circuit board.
For a clearer idea of the desired thickness, refer to this image. It’s better to err on the side of slightly thicker rather than too thin, as a bit of silicone backing will help with durability and contact.
Step 4: Remove and Prepare the Key Fob Button Indentations
This step requires a delicate touch. Carefully remove the original worn “carbon” buttons from inside of the key fob for your Chevy. Push each button from the back side of the keypad to make it protrude slightly. This will allow you to make a clean, precise cut to remove it.
Once the old buttons are removed, use your razor blade to slightly deepen the indentations where the buttons were located. The new replacement buttons will be a bit thicker than the originals, so creating a little extra space is necessary for a proper fit.
After deepening the indentations, trim your new replacement buttons to precisely fit into these spaces. Take your time and ensure they sit flush and don’t protrude excessively.
Step 5: Affix the New Buttons with Silicone
Using your toothpick, apply a very small drop of silicone sealant into one of the button indentations. Carefully place a replacement button into the indentation, pressing it down squarely. Immediately wipe away any excess silicone that squeezes out. Crucially, avoid getting any silicone on the conductive “carbon” surface of the new button that will contact the circuit board. If this happens, remove the button, clean the area, and prepare a fresh replacement button.
Allow the silicone to set for a couple of minutes, then repeat the process for the other button. Be careful not to disturb the first button while working on the second.
Step 6: Drying Time
Let the silicone dry completely for at least a couple of hours, but ideally overnight. This will ensure a strong bond and prevent the buttons from shifting during reassembly and use.
Step 7: Reassemble and Test
Clean the electrical contacts on the circuit board. A lint-free microfiber cloth lightly dampened with isopropyl alcohol works well for this. Reassemble your Chevy key fob carefully. Go to your car and test the buttons.
If the repair is successful, your key fob should now respond reliably with each button press!
If it doesn’t work immediately, disassemble the key fob again and carefully inspect the contact surfaces of the new buttons and the circuit board. Look for any silicone residue fouling the connection.
In a worst-case scenario, if you encounter problems, remember that you can always purchase a new key fob shell and swap the silicone keypad from your old one into the new shell. This might save you the added step and expense of getting a completely new remote programmed.
Good luck with your DIY key fob repair! This simple fix can significantly extend the life of your Chevy key fob and save you money. Remember to work carefully and patiently, and you’ll likely find success in bringing your key fob back to life.